
How to install headers/uppipe

Thread Starter
Registered User
iTrader: (2)
Joined: Dec 2003
Posts: 258
From: Danville, CA
Car Info: Audi Q5 aka "the old man wagon"
How to install headers/uppipe
First off make sure you have a good 3 hours to devote to this job.
BTW if you plan on installing a downpipe at some point you may as well do it along with the uppipe/headers.
Tools used:
Screw drivers: large flat head
Wrenches: 10mm, 12mm, 14mm
Sockets: 12mm, 14mm, 14mm deep
Special tools: lambda wrench
and wear gloves while doing this
1. Remove the bottom engine cover
There are 2 clips at the back of the cover that you can simply pull off
use the 12mm socket for the 2 bolts near the front
and finally the flat head screw driver to remove the clips on the sides of the wheel wells.
Then just slide it back to lower the front end of it, and pull the back end down.
2. Remove the intercooler
Use the 12mm socket for the bolts on the sides of the IC and for the bolts holding the recirculating valve.
Lightly pull the recirculating valve away from the IC
Now use the 10mm wrench to remove the bolts holding the black tubing to the IC.
Next use the large flat head screwdriver to loosen the hose clamps on the black hose going from the IC to the throttle and the clamp on the red hose holding the IC to the turbo.
Now wiggle the IC out of the engine bay and set it aside.
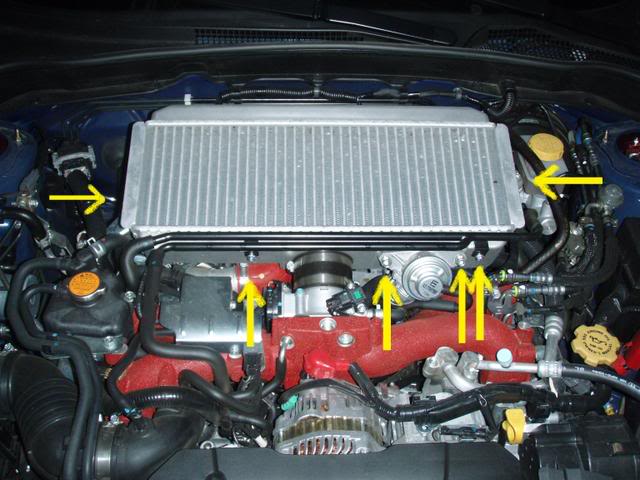
3. Remove the O2 sensors
Use the lambda wrench to loosen them
There is one on the headers and one on the downpipe.
Make sure you don't touch the end of the sensor to anything becuase they are damaged easily.
4. Remove the heatshields
Use the 12mm socket
There are 3 bolts on the drivers side shield and 4 on the passengers side shield.
Now the turbo heatshield. There are 7 bolts holding it on.
There is also a shield on the downpipe that must be removed. I think there were only 2 bolts holding it on.
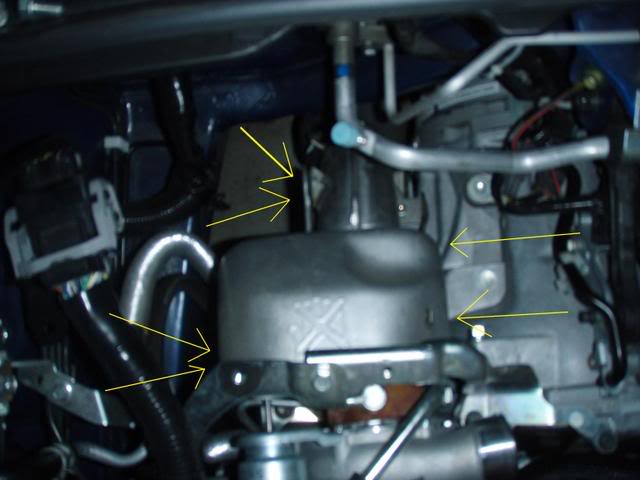
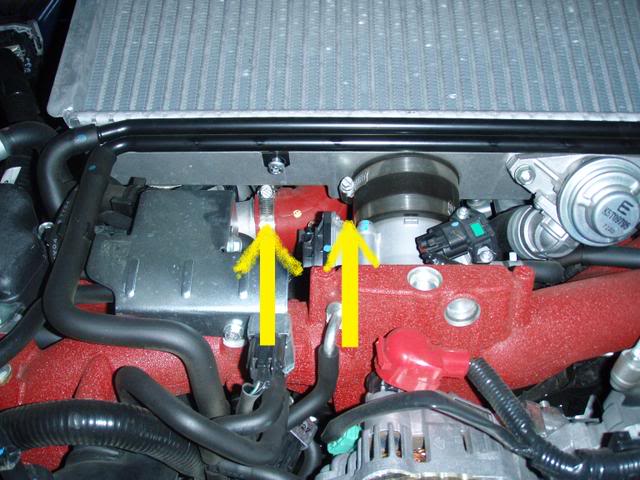
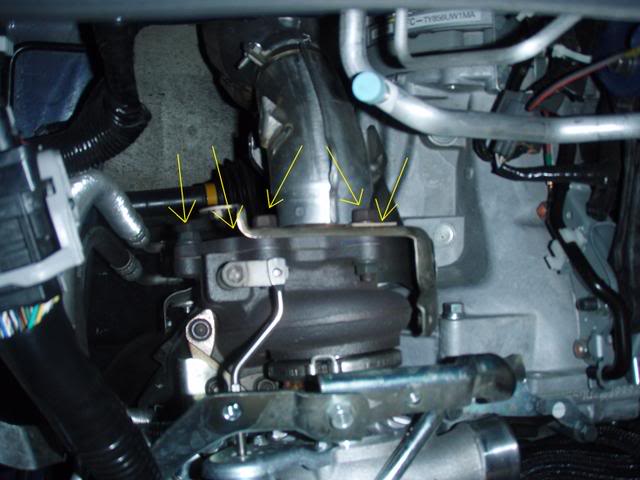
5. Remove the downpipe
For this you need the 14mm socket and 14mm wrench.
First unbolt the downpipe from the turbo
There are 3 nuts and 2 nuts/bolts holding it to the turbo.
This is where I hit my first hitch
One of the nut/bolt got stuck part way out, so I ended up just snapping the bolt, this took about 10 minutes and when it broke I slipped and messed up my hand. This is where I decided to put gloves on.
Next use the 12mm wrench and 14mm socket to unbolt the downpipe from the cat-back.
Now there are two bolts holding the downpipe to the car.
The first is by the turbo and the second is by the second cat.
Now carefully pull the downpipe away from the cat-back and then off the turbo.
6. Raise the motor slightly.
I didn't expect this step would be necessary, but if you don't do this the uppipe won't come out.
Remove the nuts on the lower engine mounts.
Place a jack under the transmission and raise it approximately 1", this will raise the engine enough.
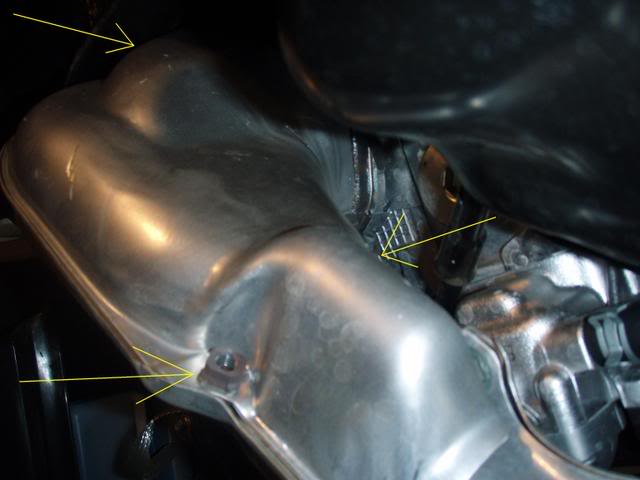
7. Remove the headers/uppipe
Now that all the preparation is done this is the fun part.
Use the 14mm socket to unscrew the 5 nuts holding the uppipe to the turbo.
Use the 14mm deep socket to unscrew the 6 nuts (3 per side) holding the headers to the engine.
Now carefully lower the headers and uppipe.
The flange on the uppipe takes some wiggling to get it through the gap between the subframe and the engine.
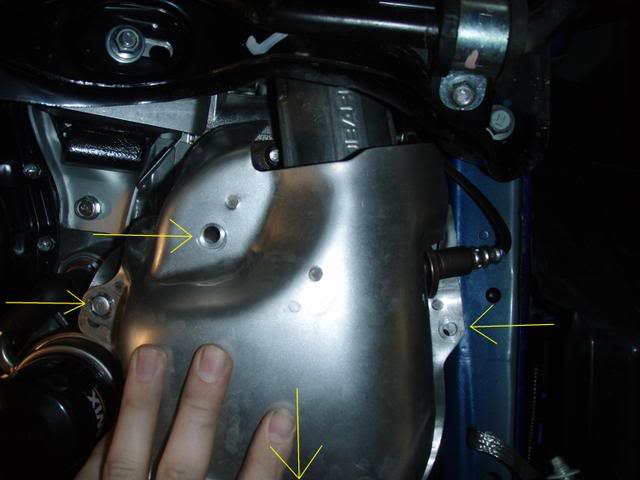
8. Install the new headers/uppipe
Now if you have the megan racing headers, the uppipe is attached, but for just about every other brand they are seperate pieces, making this a lot easier.
Next carefully wiggle the uppipe into place, and make sure you have gaskets for both sides of the headers in place.
Now line up the holes for the headers and slide them on the bolts sticking out of the engine.
Place 1 or 2 of the nuts on the header bolts, but don't tighten them, you will need some wiggle room to line up the holes for the uppipe to the turbo.
Now place the gasket on top of the uppipe and line up the holes for the uppipe on the turbo and bolt it on.
Tighten all of these now
Go back under the car and put on all the headers screws on and tighten them.
9. Lower the motor and screw the nuts holding the mounts to the sub-frame back on.
10. Put the downpipe back on
11. Put the O2 sensors back in
12. Put the heatshields back on the turbo
13. Put the intercooler back on
And you're done.

BTW if you plan on installing a downpipe at some point you may as well do it along with the uppipe/headers.
Tools used:
Screw drivers: large flat head
Wrenches: 10mm, 12mm, 14mm
Sockets: 12mm, 14mm, 14mm deep
Special tools: lambda wrench
and wear gloves while doing this
1. Remove the bottom engine cover
There are 2 clips at the back of the cover that you can simply pull off
use the 12mm socket for the 2 bolts near the front
and finally the flat head screw driver to remove the clips on the sides of the wheel wells.
Then just slide it back to lower the front end of it, and pull the back end down.
2. Remove the intercooler
Use the 12mm socket for the bolts on the sides of the IC and for the bolts holding the recirculating valve.
Lightly pull the recirculating valve away from the IC
Now use the 10mm wrench to remove the bolts holding the black tubing to the IC.
Next use the large flat head screwdriver to loosen the hose clamps on the black hose going from the IC to the throttle and the clamp on the red hose holding the IC to the turbo.
Now wiggle the IC out of the engine bay and set it aside.
3. Remove the O2 sensors
Use the lambda wrench to loosen them
There is one on the headers and one on the downpipe.
Make sure you don't touch the end of the sensor to anything becuase they are damaged easily.
4. Remove the heatshields
Use the 12mm socket
There are 3 bolts on the drivers side shield and 4 on the passengers side shield.
Now the turbo heatshield. There are 7 bolts holding it on.
There is also a shield on the downpipe that must be removed. I think there were only 2 bolts holding it on.
5. Remove the downpipe
For this you need the 14mm socket and 14mm wrench.
First unbolt the downpipe from the turbo
There are 3 nuts and 2 nuts/bolts holding it to the turbo.
This is where I hit my first hitch
One of the nut/bolt got stuck part way out, so I ended up just snapping the bolt, this took about 10 minutes and when it broke I slipped and messed up my hand. This is where I decided to put gloves on.
Next use the 12mm wrench and 14mm socket to unbolt the downpipe from the cat-back.
Now there are two bolts holding the downpipe to the car.
The first is by the turbo and the second is by the second cat.
Now carefully pull the downpipe away from the cat-back and then off the turbo.
6. Raise the motor slightly.
I didn't expect this step would be necessary, but if you don't do this the uppipe won't come out.
Remove the nuts on the lower engine mounts.
Place a jack under the transmission and raise it approximately 1", this will raise the engine enough.
7. Remove the headers/uppipe
Now that all the preparation is done this is the fun part.
Use the 14mm socket to unscrew the 5 nuts holding the uppipe to the turbo.
Use the 14mm deep socket to unscrew the 6 nuts (3 per side) holding the headers to the engine.
Now carefully lower the headers and uppipe.
The flange on the uppipe takes some wiggling to get it through the gap between the subframe and the engine.
8. Install the new headers/uppipe
Now if you have the megan racing headers, the uppipe is attached, but for just about every other brand they are seperate pieces, making this a lot easier.
Next carefully wiggle the uppipe into place, and make sure you have gaskets for both sides of the headers in place.
Now line up the holes for the headers and slide them on the bolts sticking out of the engine.
Place 1 or 2 of the nuts on the header bolts, but don't tighten them, you will need some wiggle room to line up the holes for the uppipe to the turbo.
Now place the gasket on top of the uppipe and line up the holes for the uppipe on the turbo and bolt it on.
Tighten all of these now
Go back under the car and put on all the headers screws on and tighten them.
9. Lower the motor and screw the nuts holding the mounts to the sub-frame back on.
10. Put the downpipe back on
11. Put the O2 sensors back in
12. Put the heatshields back on the turbo
13. Put the intercooler back on
And you're done.
Registered User
Joined: Nov 2007
Posts: 40
From: Queens NY
Car Info: Impreza WRX 2008
Nice write up.
Are your headers equal length or unequal? I'm goin Perrin all the way underneath. I see you have megan racing headers, any particular reason why you went with them?
Are your headers equal length or unequal? I'm goin Perrin all the way underneath. I see you have megan racing headers, any particular reason why you went with them?
Thread Starter
Registered User
iTrader: (2)
Joined: Dec 2003
Posts: 258
From: Danville, CA
Car Info: Audi Q5 aka "the old man wagon"
hey thanks.
they are unequal length.
the only reason I went with megan racing was that they were really cheap. lol.
I found them on amazon.com and from my credit card points I only had to pay for the shipping, about $20.
The other reason was that the uppipe was included.
Downsides to megan racing is the fit. It is not good. I had to push and pull a lot to get the headers to line up after I had bolted them to the turbo.
I would have gone with Perrin, but that woulda cost me way more than I can spend on the car.
Thread Starter
Registered User
iTrader: (2)
Joined: Dec 2003
Posts: 258
From: Danville, CA
Car Info: Audi Q5 aka "the old man wagon"

Thread
Thread Starter
Forum
Replies
Last Post
oyrocker47@hotm
Engine/Power - non turbo (All non turbo Imprezas)
8
Feb 1, 2007 01:01 PM
wrxgti22
Engine/Power - EJ20T (pre-2006 WRX and JDM)
10
Jan 7, 2006 10:07 PM
BoOm
Hawaii
42
Nov 12, 2005 08:45 PM
titsataki
NorCal Classifieds
5
Nov 5, 2004 09:05 PM