
DIY Notes - Atlas Kwik Bay 7000 Installation.


Thread Starter
Registered User
iTrader: (3)
Joined: Jan 2012
Posts: 608
From: Dublin, CA
Car Info: STI Hatch - 2012
DIY Notes - Atlas Kwik Bay 7000 Installation.
Some notes, because I know alot of people want to have lifts in their garages (moved this to the correct section)
Tools Needed
3/4" Combination Wrench (for Hydraulic Fittings)
3/4" Socket and Wrench (for Banjo Fitting)
Phillips Screwdriver
Wire Stripper
10 mm wrench (for lag screws)
2 - 2x4 Wood - used for lever
Jackstand (lever fulcrum)
Straps
Pallet Jack
Grease Gun (for Zerk Fitting)
Tin Snips
Supplies Need
Thread Sealant
2 Gallon R&O Hydraulic Oil
125v / 15 AMP 3 Prong Plug
8MM OD Polyurethane PU Air Tube Hose (3 feet)
Grease
Where to Buy
Two Places sell them, Greg Smith Equipment Sales, eAutoTools.com.
Greg Smith Equipment - doesn't charge sales tax but shipping was alot more expensive
Unit Cost: 2295$
Shipping Cost: 430$+ (San Leandro Terminal)
eAutoTools - charges sales tax but shipping was alot less expensive.
Unit Cost: 2295$ ( plus -1% discount for getting on their mailing list)
Shipping Cost: 178$+ (Livermore Terminal)
Tax: 292.25$
In the end, Greg Smith Equipment was about 20$ less expensive than eAutoTools.com but meant that I had to pick it up at San Leandro vs. Livermore (from Dublin) - would have paid that as mileage rental for the truck so I chose what was closer.
I picked it up at the Freight Terminal (Will-Call) - instead of getting it delivered at home. It may have made more sense if they delivered it at home (I live in a Town house) but make sure the delivery truck has the capability of getting it down to the ground (lift gate service). MAKE SURE you rent a PALLET JACK (to get it into your garage - unless you have a Fork Lift at home). This thing weights 1200 lbs.
Considering I made it a lot more complicated for myself - I rented a 14 foot uHaul moving truck and went to the terminal. The Freight Company didn't have any issues loading it with their forklift. Mine was packaged up sitting on top two wooden pallets (pallets were side by side) - it may not fit in a pickup truck due to the raised wheel wells.
It was "FUN" trying to get it to the ground from the uHaul truck (yes, the aluminum ramps are strong enough to let it slide to the ground). You will definitely need a PALLET JACK to move this into your garage (rent one from your local equipment rental - around 40$ per day). Or you may get lucky and have 4 burly Nordic power lifters around as neighbors whose last names end with Magnusson (don't try it with your buddies though, might get a hernia). Once again, the platform is over 1200 lbs.
It also helps to make sure the delivery company gives you both "pieces" to the lift. Mine forgot to give me the control unit (had to pick it up the next day), they argued with me that 2 items meant the two pallets the platform was sitting on :rollseyes:
Upcoming notes:
B) Removing the pallets
C) Removing the platforms
D) Hookup hydraulic lines
E) Wire power cables
F) Putting it all together


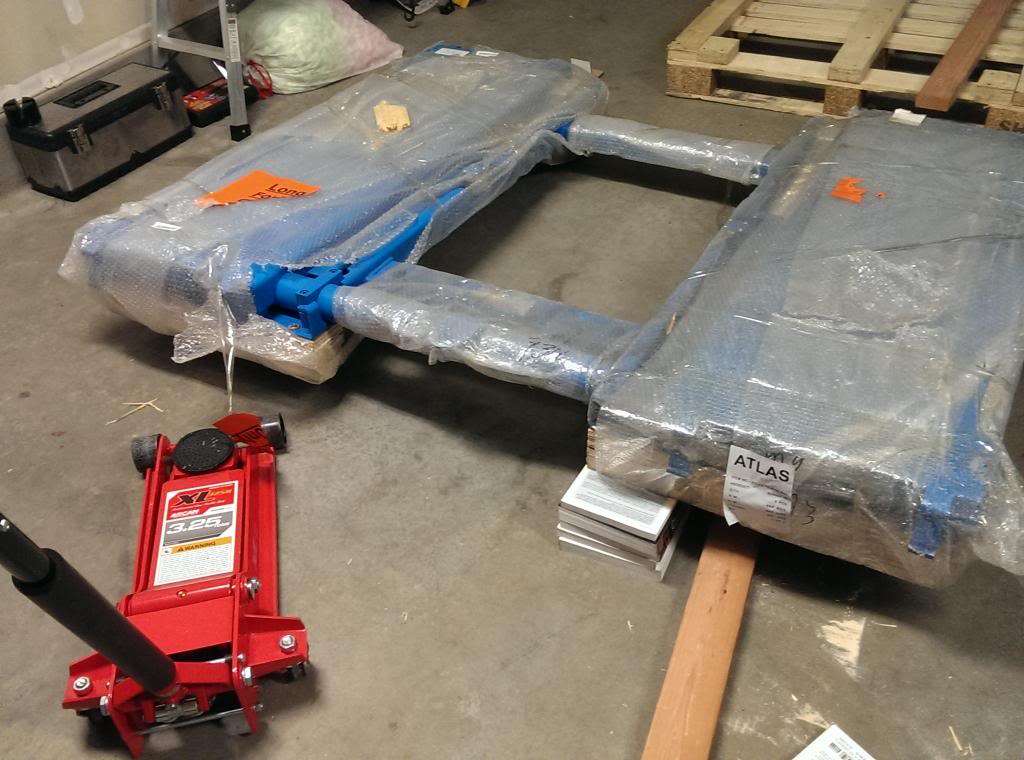
How do I get this darned thing off the pallets?
Had to improvise, Darin Nashimura of West End Alignment in SoCal used to align and corner balance my EVO and it had something to do with transferring the weight. I implemented a similar strategy..
UPDATE: If I were to do this again, I would have gone with the LEVER and STRAP method - saves alot more time.

B-1) Cut out an area for the jack to slide into one side and raise it enough (the weight will transfer to the other pallet ) so the pallet where the notch/cutout can be pulled out.

B-2) Now that the right pallet is removed, allow the right side to lower itself and touch the floor (if your jack gets stuck, just use a 2x4 as a pry bar to lift it slightly and release the jack. (This will prop up the left side now)

B-3) Use your jack an maybe a stack of books to lift the other corner which will allow you to pull the remaining pallet out.
B-4) Put some books on the right side and lower the jack. The front side will be propped up, supported by the books.

B-5) Put the jack in the middle of the cross beam (thick tubular steel) - lift it up, remove the books and lower it to the ground.

C-1) Remove Lag Screws bolting the lift to the platform (one side at a time).

C-2) Use a lever and to lift up one side and remove the wooden platforms.

C-3) Then lift up the other side and remove the other platform, lift should be fully on the ground.

C-4) Using a C-CLIP plier, remove the clips from the ramps.

C-5) Spray some Lithium Grease on the rod

C-6) Attach the ramps back onto the lift and insert the rod, then re-install the C-CLIPS

C-7) Ramp installed, do the same thing on the remaining three.

D-1) Put some thread sealant on the Hydraulic Distribution Block Pipe Fittings (I used Jomar Seal WOG Thread Sealant - good for Water / Oil / Gas - can buy them at the Truck Supply Parts)

D-2) Using a 3/4 Standard Wrench, attach the hydraulic lines and air line to the supply line hose. Make sure the fittings are tight.

D-3) Remove the Cover from the Console (4 screws) and attach the Hose (Banjo), and the Air Line to the lift.

D-4) The compressor feed air line is connected via pneumatic quick-connect fittings (push-in type). You will need an intermediate Pneumatic Polyurethane (PUR) Tube which has an 8mm OD (outer diameter) and 5 MM ID (inner diameter). It's the same stuff as the black hard air lines that comes with the lift except it's slightly larger. I wasn't able to find this stuff locally and had to mail order it - available in Amazon and EBay..


D-5) You will need to attach a 1/4 NPT Male Thread Connector to the provided pneumatic straight quick connect coupler. You will then be able to attach it to your compressor's air hose.

E-1) Purchase a 3-prong plug from Home Depot - make sure it's rated 125V @ 15 amps

E-2) Strip the wires, BLUE is NEUTRAL, BLACK is HOT, and YELLOW/GREEN is GROUND


E-3) Attach the wires it to the 3-prong plug

E-4) Finished Plug

F-1) Purchase 2 Gallon Jug of R&O Hydraulic Oil from Walmart

F-2) Make sure the reservoir drain plug is tight, fill the drum with the Hydraulic Fluid (it took about a gallon and a half).

F-3) Plug the power cable and make sure your Air Compressor is on (air line from compressor attached), turn the console on and press up to operate the lift. Make sure there aren't any hydraulic leaks or air line leaks. I had an air leak on the solenoid fittings controlling the air released locks which required that I apply some sealants on said fittings.
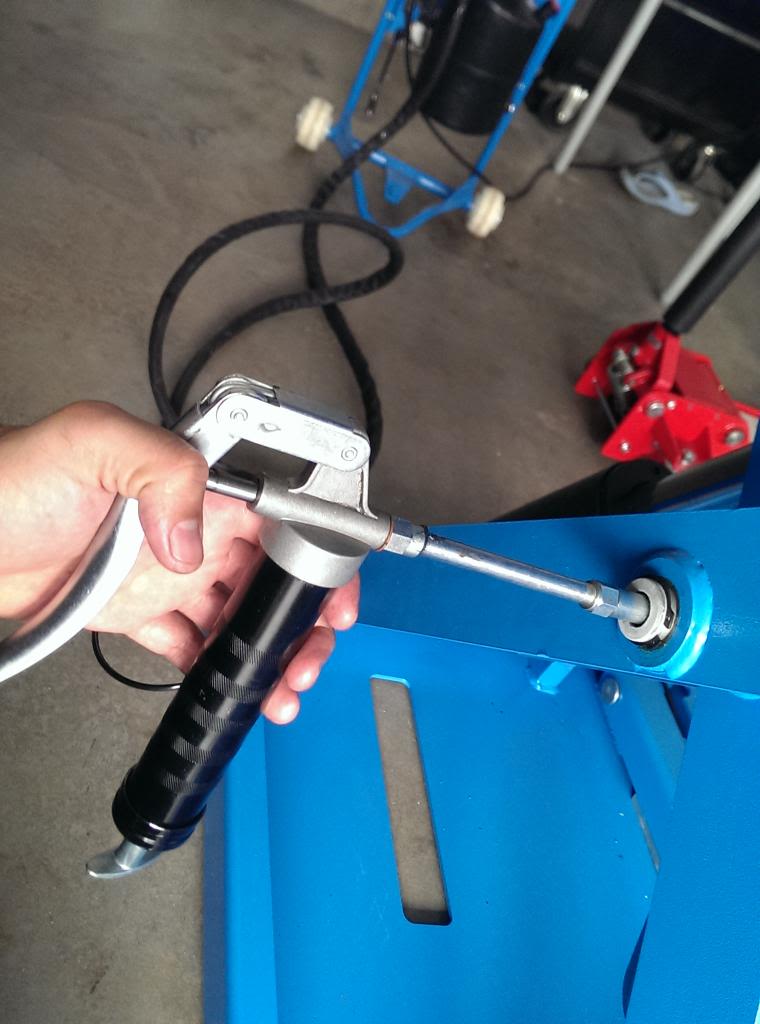


F-4) Using your grease-gun, put some grease on the lifting joints via the Zerk fitting (there's a total of 4).
F-5) Make sure there are no hydraulic leaks anywhere, operate the LIFT up and down a few times then double check the Hydraulic Fluid reservoir then put the console's cover back on.
FIN.
Tools Needed
3/4" Combination Wrench (for Hydraulic Fittings)
3/4" Socket and Wrench (for Banjo Fitting)
Phillips Screwdriver
Wire Stripper
10 mm wrench (for lag screws)
2 - 2x4 Wood - used for lever
Jackstand (lever fulcrum)
Straps
Pallet Jack
Grease Gun (for Zerk Fitting)
Tin Snips
Supplies Need
Thread Sealant
2 Gallon R&O Hydraulic Oil
125v / 15 AMP 3 Prong Plug
8MM OD Polyurethane PU Air Tube Hose (3 feet)
Grease
Where to Buy
Two Places sell them, Greg Smith Equipment Sales, eAutoTools.com.
Greg Smith Equipment - doesn't charge sales tax but shipping was alot more expensive
Unit Cost: 2295$
Shipping Cost: 430$+ (San Leandro Terminal)
eAutoTools - charges sales tax but shipping was alot less expensive.
Unit Cost: 2295$ ( plus -1% discount for getting on their mailing list)
Shipping Cost: 178$+ (Livermore Terminal)
Tax: 292.25$
In the end, Greg Smith Equipment was about 20$ less expensive than eAutoTools.com but meant that I had to pick it up at San Leandro vs. Livermore (from Dublin) - would have paid that as mileage rental for the truck so I chose what was closer.
I picked it up at the Freight Terminal (Will-Call) - instead of getting it delivered at home. It may have made more sense if they delivered it at home (I live in a Town house) but make sure the delivery truck has the capability of getting it down to the ground (lift gate service). MAKE SURE you rent a PALLET JACK (to get it into your garage - unless you have a Fork Lift at home). This thing weights 1200 lbs.
Considering I made it a lot more complicated for myself - I rented a 14 foot uHaul moving truck and went to the terminal. The Freight Company didn't have any issues loading it with their forklift. Mine was packaged up sitting on top two wooden pallets (pallets were side by side) - it may not fit in a pickup truck due to the raised wheel wells.
It was "FUN" trying to get it to the ground from the uHaul truck (yes, the aluminum ramps are strong enough to let it slide to the ground). You will definitely need a PALLET JACK to move this into your garage (rent one from your local equipment rental - around 40$ per day). Or you may get lucky and have 4 burly Nordic power lifters around as neighbors whose last names end with Magnusson (don't try it with your buddies though, might get a hernia). Once again, the platform is over 1200 lbs.
It also helps to make sure the delivery company gives you both "pieces" to the lift. Mine forgot to give me the control unit (had to pick it up the next day), they argued with me that 2 items meant the two pallets the platform was sitting on :rollseyes:
Upcoming notes:
B) Removing the pallets
C) Removing the platforms
D) Hookup hydraulic lines
E) Wire power cables
F) Putting it all together
How do I get this darned thing off the pallets?
Had to improvise, Darin Nashimura of West End Alignment in SoCal used to align and corner balance my EVO and it had something to do with transferring the weight. I implemented a similar strategy..
UPDATE: If I were to do this again, I would have gone with the LEVER and STRAP method - saves alot more time.
B-1) Cut out an area for the jack to slide into one side and raise it enough (the weight will transfer to the other pallet ) so the pallet where the notch/cutout can be pulled out.

B-2) Now that the right pallet is removed, allow the right side to lower itself and touch the floor (if your jack gets stuck, just use a 2x4 as a pry bar to lift it slightly and release the jack. (This will prop up the left side now)

B-3) Use your jack an maybe a stack of books to lift the other corner which will allow you to pull the remaining pallet out.
B-4) Put some books on the right side and lower the jack. The front side will be propped up, supported by the books.
B-5) Put the jack in the middle of the cross beam (thick tubular steel) - lift it up, remove the books and lower it to the ground.
C-1) Remove Lag Screws bolting the lift to the platform (one side at a time).
C-2) Use a lever and to lift up one side and remove the wooden platforms.
C-3) Then lift up the other side and remove the other platform, lift should be fully on the ground.
C-4) Using a C-CLIP plier, remove the clips from the ramps.
C-5) Spray some Lithium Grease on the rod
C-6) Attach the ramps back onto the lift and insert the rod, then re-install the C-CLIPS
C-7) Ramp installed, do the same thing on the remaining three.
D-1) Put some thread sealant on the Hydraulic Distribution Block Pipe Fittings (I used Jomar Seal WOG Thread Sealant - good for Water / Oil / Gas - can buy them at the Truck Supply Parts)
D-2) Using a 3/4 Standard Wrench, attach the hydraulic lines and air line to the supply line hose. Make sure the fittings are tight.
D-3) Remove the Cover from the Console (4 screws) and attach the Hose (Banjo), and the Air Line to the lift.
D-4) The compressor feed air line is connected via pneumatic quick-connect fittings (push-in type). You will need an intermediate Pneumatic Polyurethane (PUR) Tube which has an 8mm OD (outer diameter) and 5 MM ID (inner diameter). It's the same stuff as the black hard air lines that comes with the lift except it's slightly larger. I wasn't able to find this stuff locally and had to mail order it - available in Amazon and EBay..
D-5) You will need to attach a 1/4 NPT Male Thread Connector to the provided pneumatic straight quick connect coupler. You will then be able to attach it to your compressor's air hose.

E-1) Purchase a 3-prong plug from Home Depot - make sure it's rated 125V @ 15 amps
E-2) Strip the wires, BLUE is NEUTRAL, BLACK is HOT, and YELLOW/GREEN is GROUND
E-3) Attach the wires it to the 3-prong plug
E-4) Finished Plug
F-1) Purchase 2 Gallon Jug of R&O Hydraulic Oil from Walmart
F-2) Make sure the reservoir drain plug is tight, fill the drum with the Hydraulic Fluid (it took about a gallon and a half).
F-3) Plug the power cable and make sure your Air Compressor is on (air line from compressor attached), turn the console on and press up to operate the lift. Make sure there aren't any hydraulic leaks or air line leaks. I had an air leak on the solenoid fittings controlling the air released locks which required that I apply some sealants on said fittings.
F-4) Using your grease-gun, put some grease on the lifting joints via the Zerk fitting (there's a total of 4).
F-5) Make sure there are no hydraulic leaks anywhere, operate the LIFT up and down a few times then double check the Hydraulic Fluid reservoir then put the console's cover back on.
FIN.
Last edited by Funks; Apr 7, 2014 at 11:11 PM.

VIP Member
iTrader: (9)
Joined: Nov 2002
Posts: 4,665
From: No So Co
Car Info: '00 BRP RS Sedan / '04 PSM FXT (RIP)
Thanks for the writeup. I'm on the fence as to whether I want some form of two post or a scissor lift like this. If I went this route I think I'll probably dig out and flush mount it a la Jack Olsen:
http://www.garagejournal.com/forum/s...ght=jack+olsen
I think I should have the height for a two post and I'd like to be able to get to the exhaust and drivetrain. Plus, being able to put the car higher in the air certainly has its appeal. Either way I go, thanks for adding more fuel to the fire
-Brian
Thread Starter
Registered User
iTrader: (3)
Joined: Jan 2012
Posts: 608
From: Dublin, CA
Car Info: STI Hatch - 2012
I live in a townhouse and it has post tension slabs, ceiling is not very high either so this was perfect for me. Raises the car 40 inches. I can drop the transmission with mine as the middle is open (not as open as a 2-post though)..
Last edited by Funks; Apr 16, 2014 at 11:27 PM.
VIP Member
iTrader: (9)
Joined: Nov 2002
Posts: 4,665
From: No So Co
Car Info: '00 BRP RS Sedan / '04 PSM FXT (RIP)
If you don't have post-tension slabs, why not just get a DANNMAR MAXJAX? You can buy them from costco.com and it's cheaper than the one I got. o need to dig as you can put it away when not in use and 2-post lifts give you much more access. If you think your concrete ain't good enough, you can always cut out some concrete and get some good stuff poured (lots of people do it).
I live in a townhouse and it has post tension slabs, ceiling is not very high either so this was perfect for me. Raises the car 40 inches. I can drop the transmission with mine as the middle is open (not as open as a 2-post though)..
I live in a townhouse and it has post tension slabs, ceiling is not very high either so this was perfect for me. Raises the car 40 inches. I can drop the transmission with mine as the middle is open (not as open as a 2-post though)..

-Brian
Thread Starter
Registered User
iTrader: (3)
Joined: Jan 2012
Posts: 608
From: Dublin, CA
Car Info: STI Hatch - 2012
Some pics (my 2012 STI is up on the lift)..
Shot of the undercarriage access - note, middle is open..

Around 40 inches of vertical height from floor to oil drain.

Around 41 inches of vertical height to bottom of front bumper.

View from the front.

Shot of the undercarriage access - note, middle is open..
Around 40 inches of vertical height from floor to oil drain.
Around 41 inches of vertical height to bottom of front bumper.
View from the front.

Registered User
iTrader: (5)
Joined: Apr 2013
Posts: 1,911
From: Orinda/Palo Alto/Los Altos
Car Info: Subaru STi Sedan '13
this makes me want to move in with you lmfao. once i have my own place to live at.... i hope i have enough room to do something like that!

Thread
Thread Starter
Forum
Replies
Last Post
tekgnosis
Engine/Power - EJ20T (pre-2006 WRX and JDM)
14
Sep 7, 2006 05:21 AM
Vince25RS
Suspension, Handling, and Brakes
0
Sep 27, 2005 11:13 AM