
Ecliptech Shift-I Sequential Shift Light Install / Review.

Thread Starter
Registered User
iTrader: (5)
Joined: Aug 2006
Posts: 468
From: Kaneohe
Car Info: Bugeye Wagon - VF39'd
Ecliptech Shift-I Sequential Shift Light Install / Review.
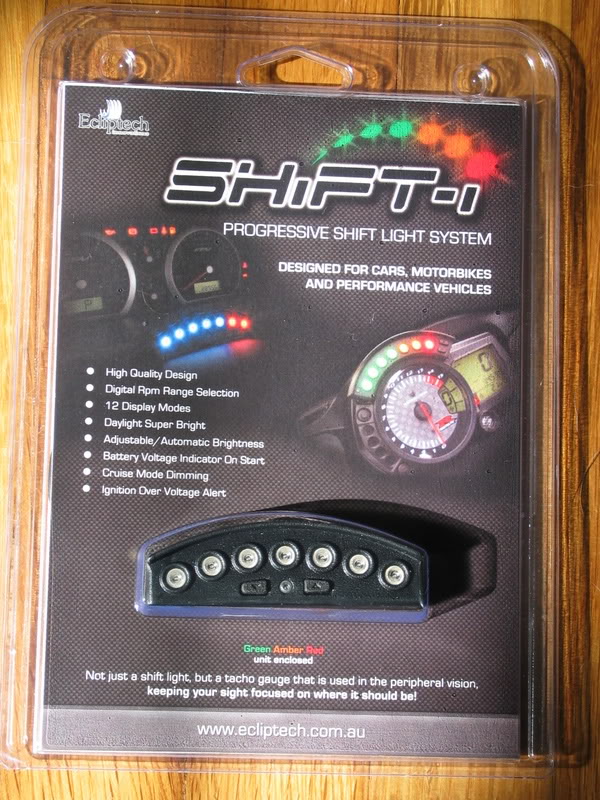
Well, after bouncing off the rev limiter a few times I decided I needed a shift light... Or... um... wanted. At least, that's what I keep telling myself.  I've always loved the sequential F1 shift lights, they impart a lot more information than a drag style single blinker and they just look cool.
So, whilst stumbling the net one day I came upon the Ecliptech Shift-I. $148 + $38 ( ) shipping and it was in it's way from the land of Oz aka "The place that has all the cool Subie stuff." I was very impressed with the customer service, I ordered on Oct 14, a Sunday, and had a personal note and tracking number in my inbox within hours. (It may have been Monday AM there though) But, it arrived on my doorstep in sunny Hawaii on the 17th. So I was very pleased on that front.
Here it is, not much to look at:
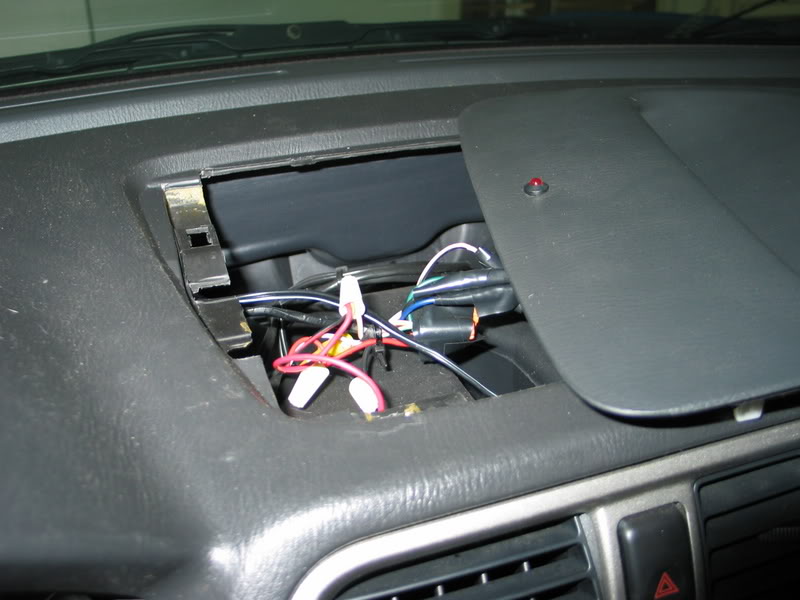
The install is a piece of cake. Remove your gauge trim and cluster. If you actually need a tutorial for this you probably shouldn't be out of the house without a helmet let alone handling sharp objects.
Then get hooking. The red/black wire goes to a switched +12v source. I used the convenient lead under the clock. The same one I used for too many other gauges. One day I'll get around to neatening everything up with actual bus bars and breakers, but not today.
The Blue/Black wire is for the tach. On my '02 this was the green wire on the right hand plug. This is the #5 wire on the plug that goes into the tach. There are numbers on the harness side of the plug so you can't screw it up. I couldn't find a decent wiring diagram and the ones on Ravensblade don't apply to the '02. NOTE: In the pic the wire is just stuck in the hole for testing. But it is the correct hole. Disregard the black wire, that's actually coming out of the #6 spot.
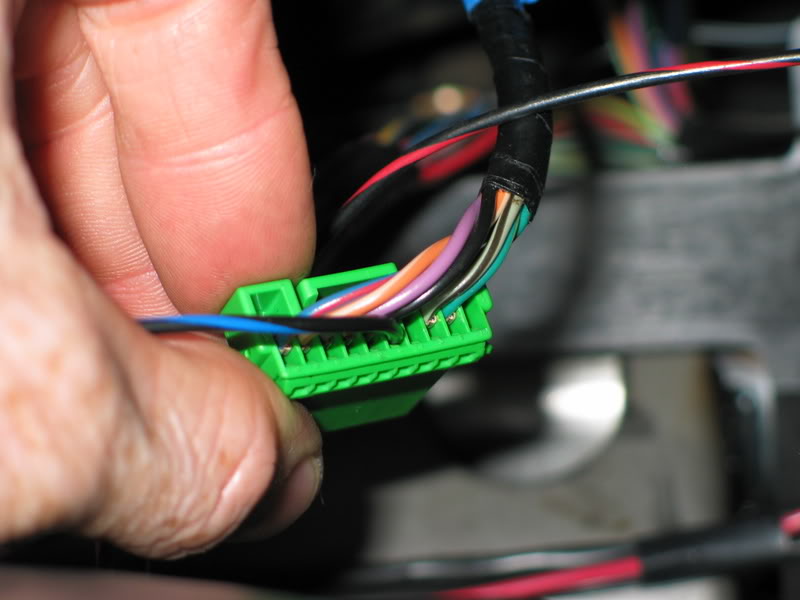
After confirming that it was the right wire I stripped a bit of insulation off a few inches back and soldered on a pigtail with an insulated female spade on the end. If I ever decide to do anything else that needs a tach signal I'll have a ready made output. It's the green wire exiting the picture upper left if you actually care. I took the shot so I'm damn well going to use it.

Then hook up the last wire (I forget which color it is, there are only three though) to any convenient ground.
I've always loved the sequential F1 shift lights, they impart a lot more information than a drag style single blinker and they just look cool.So, whilst stumbling the net one day I came upon the Ecliptech Shift-I. $148 + $38 (
) shipping and it was in it's way from the land of Oz aka "The place that has all the cool Subie stuff." I was very impressed with the customer service, I ordered on Oct 14, a Sunday, and had a personal note and tracking number in my inbox within hours. (It may have been Monday AM there though) But, it arrived on my doorstep in sunny Hawaii on the 17th. So I was very pleased on that front.Here it is, not much to look at:
The install is a piece of cake. Remove your gauge trim and cluster. If you actually need a tutorial for this you probably shouldn't be out of the house without a helmet let alone handling sharp objects.
Then get hooking. The red/black wire goes to a switched +12v source. I used the convenient lead under the clock. The same one I used for too many other gauges. One day I'll get around to neatening everything up with actual bus bars and breakers, but not today.
The Blue/Black wire is for the tach. On my '02 this was the green wire on the right hand plug. This is the #5 wire on the plug that goes into the tach. There are numbers on the harness side of the plug so you can't screw it up. I couldn't find a decent wiring diagram and the ones on Ravensblade don't apply to the '02. NOTE: In the pic the wire is just stuck in the hole for testing. But it is the correct hole. Disregard the black wire, that's actually coming out of the #6 spot.
After confirming that it was the right wire I stripped a bit of insulation off a few inches back and soldered on a pigtail with an insulated female spade on the end. If I ever decide to do anything else that needs a tach signal I'll have a ready made output. It's the green wire exiting the picture upper left if you actually care. I took the shot so I'm damn well going to use it.
Then hook up the last wire (I forget which color it is, there are only three though) to any convenient ground.
Last edited by Bushflyr; Oct 21, 2007 at 10:17 AM.
Thread Starter
Registered User
iTrader: (5)
Joined: Aug 2006
Posts: 468
From: Kaneohe
Car Info: Bugeye Wagon - VF39'd
Then to programming. This thing has more tweaks than a meth lab. Adjustable upper shift point, lower shift point, shift point adjustment step, brightness in bright light, brightness in dim light, light pattern, rpm hysterisis, cruise mode, and a bunch more. The primary options shift point and pattern are easily accessed on the fly and very intuitive. The next level of menu's is also very intuitive, but keep the instructions handy because you'll forget how to adjust the hysterisis within minutes after doing it. On the plus side most of these submenu items are of the set and forget variety. They won't require much adjusting after the first day. The shift points are easily adjustable without even having your car on which is really, nice. No revving the engine to redline trying to get the thing to blink just right. :disco:
That's about it. The unit seems well made and if it holds up (which it definitely should) I'll be very pleased and consider it money well spent. Even if just for the eye candy.
A vid of the various modes and their selection.
And a vid of revving. I set the first light to come on at 3500rpm, about when I hit full boost. And to flash at 6500, just enough time to grab the next gear before hitting the rev limiter. They'll probably need to be adjusted once I get a better tune and figure out what my dyno plot looks like.

Thread Starter
Registered User
iTrader: (5)
Joined: Aug 2006
Posts: 468
From: Kaneohe
Car Info: Bugeye Wagon - VF39'd
No, there is the Rev lite out there for ~$100, but it has nowhere near the functionality or adjustability of the the Shift-I. I would have considered the Rev-lite for their old price of $49, but since the price hike they're too spendy for what you get. Even with the shipping I felt the Shift-I was a much better value.
Registered User
iTrader: (46)
Joined: Nov 2006
Posts: 8,803
From: "Streets Closed, Pizza Boy"
Car Info: www.pinoymamba.tumblr.com
No, there is the Rev lite out there for ~$100, but it has nowhere near the functionality or adjustability of the the Shift-I. I would have considered the Rev-lite for their old price of $49, but since the price hike they're too spendy for what you get. Even with the shipping I felt the Shift-I was a much better value.

Thread
Thread Starter
Forum
Replies
Last Post
omygata
Engine/Power - EJ20T (pre-2006 WRX and JDM)
3
Nov 25, 2005 11:09 PM
MauiJammer
Aftermarket Forced Induction - Turboed factory NA engines
13
Oct 14, 2003 05:07 AM