
DIY: How to make a Carbon Fiber/Fiberglass rear diffuser from scratch


Thread Starter
Registered User
iTrader: (7)
Joined: Mar 2009
Posts: 860
From: Bay Area, CA
Car Info: 2010 997.2 GT3
DIY: How to make a Carbon Fiber/Fiberglass rear diffuser from scratch
I posted this on 3gwrx not too long ago, but I'll just post here as well.
So this is only for those who have the time and patience to work on this project. This is a laminating tutorial. You can also mold it or vacuum bag it but this is a pretty basic technique. Prepare to have your car bumperless for a bit as well. I have been fiberglassing for a while and using CF is quite similar. Some things you should know, you need to use epoxy resin and make sure it cures clear with which ever hardener you choose. You can also try a polyester resin but the downside is that it is it doen't like to be painted over and it loves to eat through foam if you use it as a core for any other projects. With that said
Materials (Amounts vary based on your project)
Epoxy Resin for CF or get fiberglass resin if you are fiberglassing
Hardener
Carbon fiber weave of your choice or fiberglass both cloth (weave) and the mat (strings)
Blue painters tape and a lot of it
Aluminum foil
A flat edge or a stucco knife
3M 77 Adhesive Spray
Cheap paint brushes
Cheap paint roller tray
***Cure times are based on the resin you use, temperature, humidity amount of hardener and etc.
Step 1
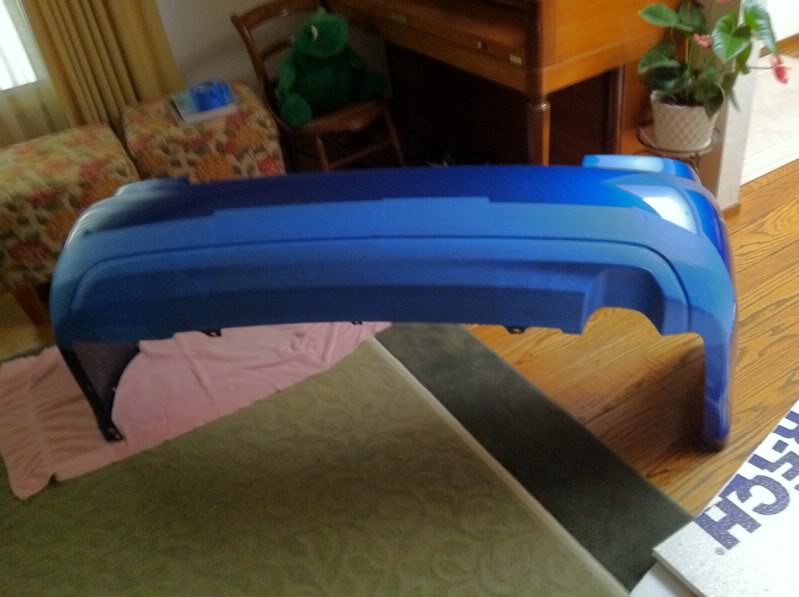
Take off your bumper
-There are two or three inside the well and four under the bumper

Step 2
Tape up your bumper
-Be sure to cover all possible areas that may come in contact.
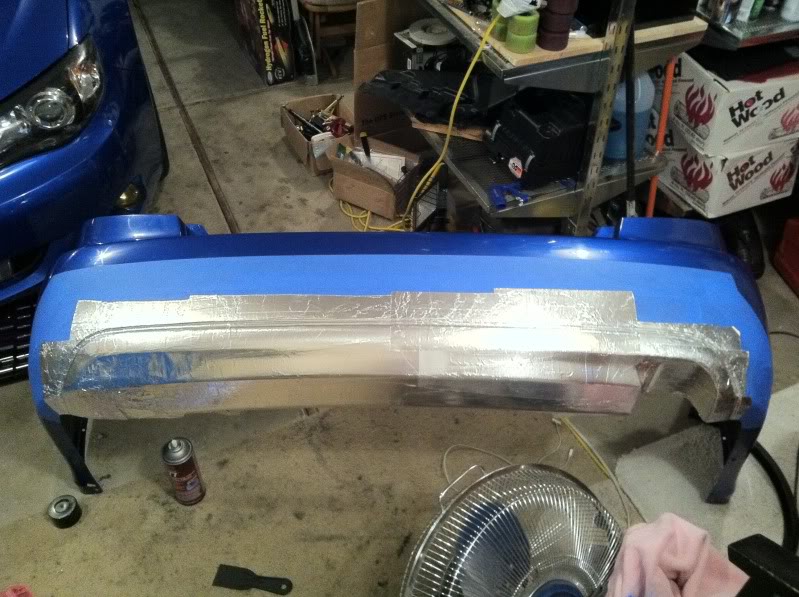
Step 3
Use the adhesive spray and put on the aluminum foil (resin won't stick to the foil)
-Use the knife to flatten it
Step 4
Mix your resin and hardener
-Put a thin coat of resin and once it starts to gel then place the cloth on top top into place and tuck in any excess cloth. Be sure to lay the cloth right the first time otherwise it will looklike the weave is going in two different places, but it will still turn out fine.


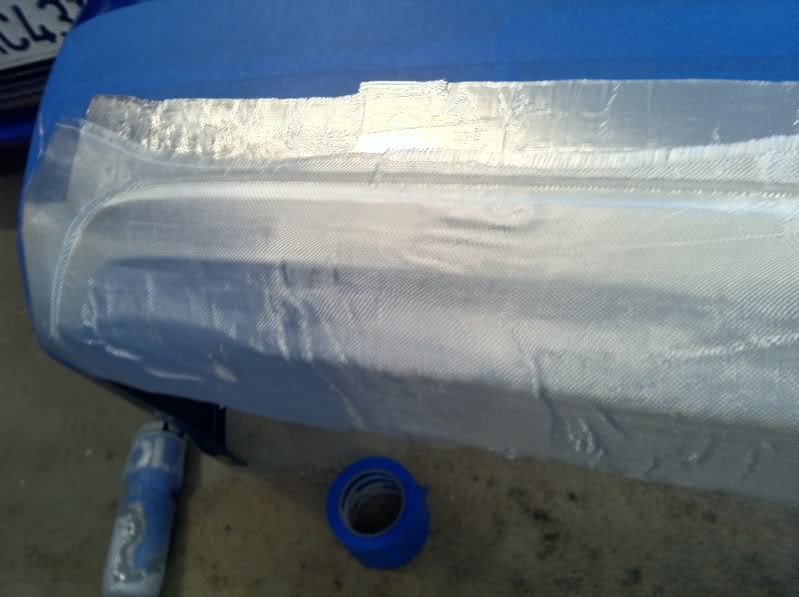

Step 5 (Repeat at least 6 times)
Mix a new batch of resin and hardener
-Apply it over and over in coats until you like it.


Step 5.5
Optional** You can use the fiberglass mat and layer it on top. It will add stability and beef it up a bit but it will create a bit more work as you will have to sand it down and bondo the holes, gaps or bubbles.

Step 6
Pop off the piece you made
-Remove the foil and tape from your bumper
Fiberglass

Carbon Fiber

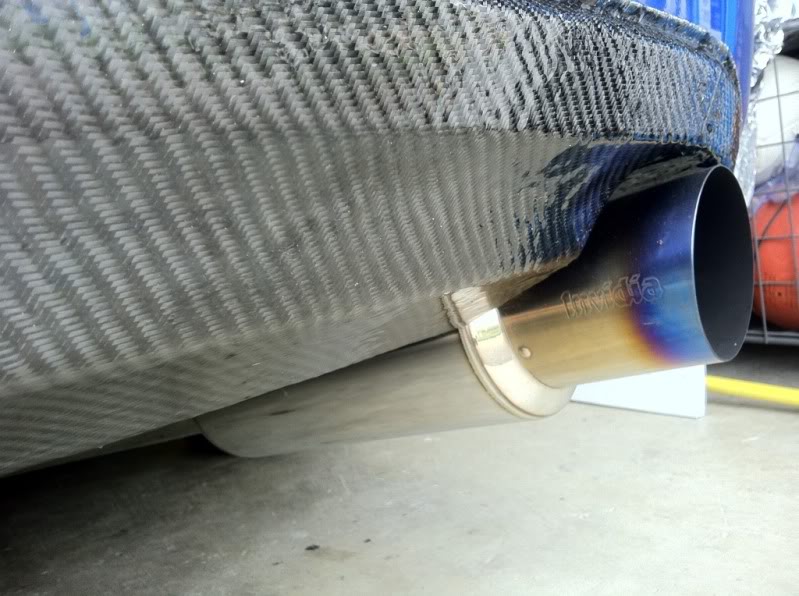
Step 7
Test fit


It still needs a few layers as well as a sanding job.
Strakes are coming soon!

I have to finish it and do the strakes still but this is where I am so far. Post any questions or comments below and I can do my best to answer them. Knowing me I probably forgetting some things in this DIY.
So this is only for those who have the time and patience to work on this project. This is a laminating tutorial. You can also mold it or vacuum bag it but this is a pretty basic technique. Prepare to have your car bumperless for a bit as well. I have been fiberglassing for a while and using CF is quite similar. Some things you should know, you need to use epoxy resin and make sure it cures clear with which ever hardener you choose. You can also try a polyester resin but the downside is that it is it doen't like to be painted over and it loves to eat through foam if you use it as a core for any other projects. With that said
Materials (Amounts vary based on your project)
Epoxy Resin for CF or get fiberglass resin if you are fiberglassing
Hardener
Carbon fiber weave of your choice or fiberglass both cloth (weave) and the mat (strings)
Blue painters tape and a lot of it
Aluminum foil
A flat edge or a stucco knife
3M 77 Adhesive Spray
Cheap paint brushes
Cheap paint roller tray
***Cure times are based on the resin you use, temperature, humidity amount of hardener and etc.
Step 1
Take off your bumper
-There are two or three inside the well and four under the bumper
Step 2
Tape up your bumper
-Be sure to cover all possible areas that may come in contact.
Step 3
Use the adhesive spray and put on the aluminum foil (resin won't stick to the foil)
-Use the knife to flatten it
Step 4
Mix your resin and hardener
-Put a thin coat of resin and once it starts to gel then place the cloth on top top into place and tuck in any excess cloth. Be sure to lay the cloth right the first time otherwise it will looklike the weave is going in two different places, but it will still turn out fine.
Step 5 (Repeat at least 6 times)
Mix a new batch of resin and hardener
-Apply it over and over in coats until you like it.
Step 5.5
Optional** You can use the fiberglass mat and layer it on top. It will add stability and beef it up a bit but it will create a bit more work as you will have to sand it down and bondo the holes, gaps or bubbles.
Step 6
Pop off the piece you made
-Remove the foil and tape from your bumper
Fiberglass
Carbon Fiber
Step 7
Test fit
It still needs a few layers as well as a sanding job.
Strakes are coming soon!
I have to finish it and do the strakes still but this is where I am so far. Post any questions or comments below and I can do my best to answer them. Knowing me I probably forgetting some things in this DIY.
Registered User
iTrader: (4)
Joined: Feb 2008
Posts: 860
From: Petaluma California & Long Beach California
Car Info: '99 RBP 2.5RS
pretty nice for homemade. i have been doing fiberglass stuff and this is pretty much the same thing.
and cost wise alex, its not that bad. i think i bought epoxy resin with hardener for $20.99 however thats only net 12 fl oz. you will prolly need way more then that to do a rear diffuser. also depending on on fine you want your weave to be i think that reflects the price too.
all in all this is a pretty cool idea, keep us updated id like to see this 100% finished and mounted up etc. nice :banana:
Thread Starter
Registered User
iTrader: (7)
Joined: Mar 2009
Posts: 860
From: Bay Area, CA
Car Info: 2010 997.2 GT3
Thanks guys!
Yeah I have a bunch of PMs for orders. I am planning on making a few and selling them. I am making them for single exits and duals. And I am making them with and without strakes
It is about
$70 for barely enough resin and hardener for a diffuser this size
$160 for Carbon Fiber 2x2 twill 120"
$40 for gloves, foil, tape, paint trays, mixing sticks
Nice, yeah fiberglass is where I started. I am working my way up the ladder and moved on to vacuum bagging and molding.
I am going on vacation for a bit but I should have a few of these done by the end of summer. Or so I am hoping.
It is about
$70 for barely enough resin and hardener for a diffuser this size
$160 for Carbon Fiber 2x2 twill 120"
$40 for gloves, foil, tape, paint trays, mixing sticks
pretty nice for homemade. i have been doing fiberglass stuff and this is pretty much the same thing.
and cost wise alex, its not that bad. i think i bought epoxy resin with hardener for $20.99 however thats only net 12 fl oz. you will prolly need way more then that to do a rear diffuser. also depending on on fine you want your weave to be i think that reflects the price too.
all in all this is a pretty cool idea, keep us updated id like to see this 100% finished and mounted up etc. nice :banana:
and cost wise alex, its not that bad. i think i bought epoxy resin with hardener for $20.99 however thats only net 12 fl oz. you will prolly need way more then that to do a rear diffuser. also depending on on fine you want your weave to be i think that reflects the price too.
all in all this is a pretty cool idea, keep us updated id like to see this 100% finished and mounted up etc. nice :banana:
I am going on vacation for a bit but I should have a few of these done by the end of summer. Or so I am hoping.
It's QQ thankyouverymuch
iTrader: (39)
Joined: May 2007
Posts: 19,721
From: San Jose
Car Info: 2011 SWP WRX Hatch
Not bad. You've been doing a lot of stuff with carbon fiber and it pretty badass.
Do you think it would be possible to make a little heatshield for my exhaust? It's starting to really take its toll on my bumper.
Do you think it would be possible to make a little heatshield for my exhaust? It's starting to really take its toll on my bumper.

Thread
Thread Starter
Forum
Replies
Last Post
dozenutts
NorCal Classifieds
21
Apr 21, 2013 12:34 PM
orwrx
NorCal Classifieds
10
Jan 15, 2012 12:12 AM
subbiedood
NorCal Classifieds
14
Dec 16, 2010 04:18 PM
clean04
NorCal Classifieds
9
May 22, 2007 11:38 AM