
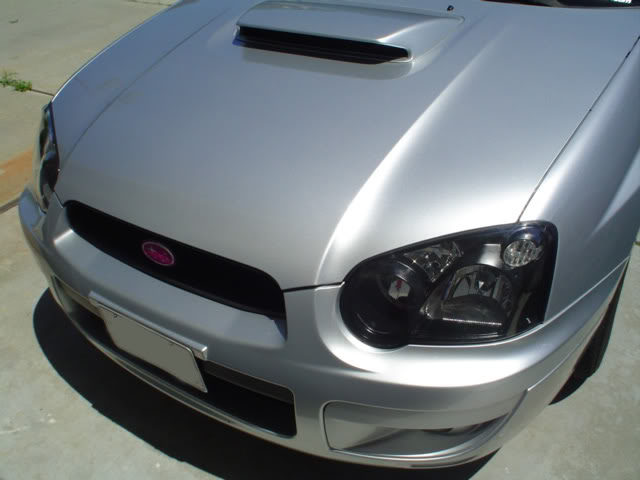
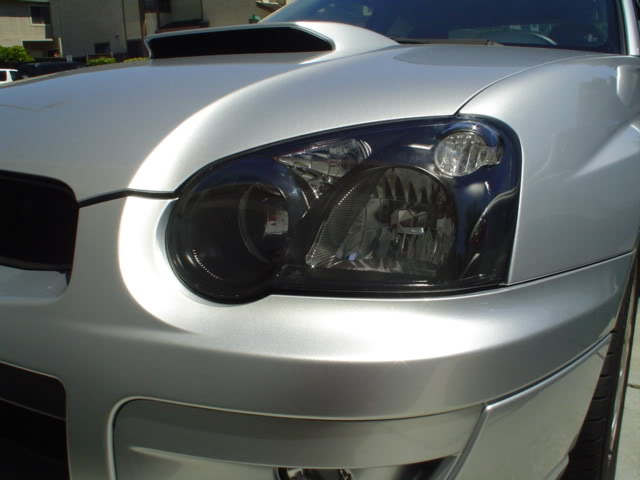
I want to black house my headlights... Need help

Registered User
iTrader: (4)
Joined: Sep 2004
Posts: 796
From: hayward/long beach
Car Info: 04 aspen white wrx
VIP Member
iTrader: (8)
Joined: Jun 2004
Posts: 2,470
From: Fremont/Las Vegas
Car Info: 2004 PSM WRX
yea, just follow those steps from scoobymods.com, and when the whole head light is open just paint the houseing. you need 800 grit sandpaper and whatever black you wanna use. make sure its able to withstand high heat because its goin back in the oven...i used engine enamel [500 degrees] "flat black" then put a lot of clear coat on it
the artist formerly known as mcdrama
iTrader: (23)
Joined: Apr 2004
Posts: 6,428
From: Santa Cruz Mountains, CA.
Car Info: WRBP 2015 WRX Premium/CVT
Originally Posted by thesnowboarder
when i get the headlight apart do i have to scrape the crome off or anything?
Registered User
iTrader: (3)
Joined: Jul 2005
Posts: 2,576
From: Fairfield B&N Drive & BBQ
Car Info: 02 PSM Bugeye & Kawasaki Z1000
you dont have to sand down the chrome......you are just adding more work for yourself. I dont know if it looks better if you sand it down but i didnt.

Thread Starter
Registered User
iTrader: (6)
Joined: Apr 2005
Posts: 1,114
From: San Mateo
Car Info: 1990 turbo miata
Originally Posted by flipmode
you dont have to sand down the chrome......you are just adding more work for yourself. I dont know if it looks better if you sand it down but i didnt.
I have done 5 sets of lights with not one complaint of leaks. Use the oven, place the light on a cookie sheet 200 deg F for 12 min. Be sure to have all of the screws removed prior to placing in the oven. AS soon as you remove it from the oven place a slotted screw driver in the outer upper corner of the light housing, with you finger tips hold the lens part of the light as you push the screw driver into the seam. Keep pushing, don't pry, soon it will begin to separate. Once the lense cover begins to separate from the rear housing simply pull the two apart. Have the screw drivewr handy to collect some the adhesive that will stretch as you pull it apart. As for painting the reflector, scuff up as much of the shiny stuff as possible. It is very easy to knock this stuff down. Use an 800 to 1200 grit wet sanding method. I response to the above post it is very important to prep this part as you would prep any paint job. The piece has a mold release on it wich may not allow the fist couple of coats to lay properly. Trust me you can tell if someone has done it right or not regardless of what they say. Moving forward, once you complete your wet sanding and it looks good and clean (use a tacky cloth or rinse and let dry), do yoour self a favor and use some duplicolor adhesion promoter. It goes on real easy, just a couple of light coats will really pay off in the end. With in a couple of min of applying to promoter apply the color coat. Dupli-color makes a really good high temp engine enamel. I went for more the satin finish than the shiny. This of course is personal preference. Remember first couple of coats, make 'em light, to set up a nice base for a third and final wet coat.
Tips:
1.Wear gloves, only touch what you have to
2.Make sure your oven temp setting is acurate
3.Remove all screws before placing in the oven
4.Proper Prepping while painting will save you in the end
5.Apply a bead of black RTV in the channel of the housing prior to reassembly
6.Partialy reassemble the lens cover and the housing and place in oven for 12min prior to tightening the housing.
7.Wear gloves
8. If you don't feel comfortable let someone know. PM me if you want, I'll gladly help you out to make sure it's done right.
Hope this helps, again feel free to shoot me a PM if you'd like some assistance.
Late,
Jeff
Registered User
iTrader: (1)
Joined: Nov 2002
Posts: 2,504
From: Leg Humper
Car Info: '03 WRX wagon, faster than walkin'
Wow,
Thanks, cause I want to do mine too
I keep thinking, I'll do it this weekend, but I never do.
Thanks again.
Thanks, cause I want to do mine too
I keep thinking, I'll do it this weekend, but I never do.
Thanks again.
Originally Posted by ipozestu
I have done 5 sets of lights with not one complaint of leaks. Use the oven, place the light on a cookie sheet 200 deg F for 12 min. Be sure to have all of the screws removed prior to placing in the oven. AS soon as you remove it from the oven place a slotted screw driver in the outer upper corner of the light housing, with you finger tips hold the lens part of the light as you push the screw driver into the seam. Keep pushing, don't pry, soon it will begin to separate. Once the lense cover begins to separate from the rear housing simply pull the two apart. Have the screw drivewr handy to collect some the adhesive that will stretch as you pull it apart. As for painting the reflector, scuff up as much of the shiny stuff as possible. It is very easy to knock this stuff down. Use an 800 to 1200 grit wet sanding method. I response to the above post it is very important to prep this part as you would prep any paint job. The piece has a mold release on it wich may not allow the fist couple of coats to lay properly. Trust me you can tell if someone has done it right or not regardless of what they say. Moving forward, once you complete your wet sanding and it looks good and clean (use a tacky cloth or rinse and let dry), do yoour self a favor and use some duplicolor adhesion promoter. It goes on real easy, just a couple of light coats will really pay off in the end. With in a couple of min of applying to promoter apply the color coat. Dupli-color makes a really good high temp engine enamel. I went for more the satin finish than the shiny. This of course is personal preference. Remember first couple of coats, make 'em light, to set up a nice base for a third and final wet coat.
Tips:
1.Wear gloves, only touch what you have to
2.Make sure your oven temp setting is acurate
3.Remove all screws before placing in the oven
4.Proper Prepping while painting will save you in the end
5.Apply a bead of black RTV in the channel of the housing prior to reassembly
6.Partialy reassemble the lens cover and the housing and place in oven for 12min prior to tightening the housing.
7.Wear gloves
8. If you don't feel comfortable let someone know. PM me if you want, I'll gladly help you out to make sure it's done right.
Hope this helps, again feel free to shoot me a PM if you'd like some assistance.
Late,
Jeff
Tips:
1.Wear gloves, only touch what you have to
2.Make sure your oven temp setting is acurate
3.Remove all screws before placing in the oven
4.Proper Prepping while painting will save you in the end
5.Apply a bead of black RTV in the channel of the housing prior to reassembly
6.Partialy reassemble the lens cover and the housing and place in oven for 12min prior to tightening the housing.
7.Wear gloves
8. If you don't feel comfortable let someone know. PM me if you want, I'll gladly help you out to make sure it's done right.
Hope this helps, again feel free to shoot me a PM if you'd like some assistance.
Late,
Jeff
VIP Member
iTrader: (7)
Joined: Jan 2005
Posts: 2,168
From: EBAIC- Wondering if I should have taken the blue pill...
Car Info: 03 WRX wagon type RA
Great write-up, ipozestu! I've wanted to do mine but was always afraid of screwing them up. Thanks for the info! Now I think I'll do them!
Thread Starter
Registered User
iTrader: (6)
Joined: Apr 2005
Posts: 1,114
From: San Mateo
Car Info: 1990 turbo miata
Originally Posted by slvrsubywgn
Great write-up, ipozestu! I've wanted to do mine but was always afraid of screwing them up. Thanks for the info! Now I think I'll do them!
agreed everyone post ur pics as u finish ur lights