
Dirty Engine? Show your Scrubbing Bubbles Pic!


Thread Starter
Registered User
iTrader: (3)
Joined: Jan 2012
Posts: 608
From: Dublin, CA
Car Info: STI Hatch - 2012
Dirty Engine? Show your Scrubbing Bubbles Pic!
Procedure:
1) Disconnect the battery, and cover it up with a plastic bag along with the alternator.
2) When the engine is still a bit warm - spray it with Scubbing Bubbles, and let it fizz around for 10-15 minutes
3) Rinse the engine off with water (low pressure).
I'll start, here's mine.. Thing works well... I dressed up the plastic bits with 303 Aerospace Protectant after cleaning it..
Last edited by Funks; Oct 8, 2014 at 11:56 PM.
Thread Starter
Registered User
iTrader: (3)
Joined: Jan 2012
Posts: 608
From: Dublin, CA
Car Info: STI Hatch - 2012
Don't know what to tell you. Never had it leak. Its made of metal, not plastic and feels like a quality piece to me.. ( radiator and radiator cap )
Last edited by Funks; Oct 10, 2014 at 12:26 AM.
Technical Know-It-All
Joined: Oct 2003
Posts: 2,123
From: Sterling, VA
Car Info: '02 WRX + '15 WRX
Lol Overbear.
The factory STI radiator has been shown to produce lower coolant temps than the Mishimoto one. And yes, most caps leak.
Sorry for further side tracking.
The factory STI radiator has been shown to produce lower coolant temps than the Mishimoto one. And yes, most caps leak.
Sorry for further side tracking.
Thread Starter
Registered User
iTrader: (3)
Joined: Jan 2012
Posts: 608
From: Dublin, CA
Car Info: STI Hatch - 2012
I've bought three Mishimoto products for my STI - Thermostatic Oil Cooler, 2-Row Performance Aluminum Radiator, and their 08+ Top Mount Intercooler. Had some minor issues with the installs ( mostly due to them not having updated instructions on their site, and one minor hardware issue with the oil cooler hose fitting ), nevertheless - they fit well with no hacking, and some of the products have documented test results. Reading other forums, seems like Mishimoto included a plastic radiator cap on their older radiators, but the one I got was made of metal and so far, no leaks anywhere.
I don't know how much / if there is any performance improvement with their 2-row radiator, over the 08+ stocker but it's twice as thick, holds more water and my car seems to cool down faster. Also noticed that the stocker does have a higher FIN-PER-INCH density than the mishimoto radiator. Another person in IWSTI posted about owning the 3-Core version (X-Line) and it worked well for him in the Middle East, and another person posted he used it at the track in the Nurburgring (but did mention it didn't cool as well as his buddies ARC Radiator). I checked the Mishimoto website and they don't seem to have Engineering notes on the 2-Row radiators for my car.
With all that said, where them pics? I hope some of you guys clean your engine bays with Scrubbing bubbles and post em up. I'll try using it on my wheels and see if it cleans it, Sonax and the Griots wheel sprays are too expensive..
Last edited by Funks; Oct 10, 2014 at 11:13 PM.

Thread Starter
Registered User
iTrader: (3)
Joined: Jan 2012
Posts: 608
From: Dublin, CA
Car Info: STI Hatch - 2012
Just disconnect the battery, and don't spray on the alternator and if you really want to be extra careful, avoid any sensor. Go to town on any non-electrical bits. Just make sure you wash it out with water and maybe even let it dry for a couple of hours.
Dimitri (not sure what his nick here is who goes to the Dublin meet from time to time) also did it on his car. Also came out pretty clean.
Dimitri (not sure what his nick here is who goes to the Dublin meet from time to time) also did it on his car. Also came out pretty clean.

Registered User
Joined: Jan 2014
Posts: 52
From: SF Bay Area
Car Info: 2002 Forester L
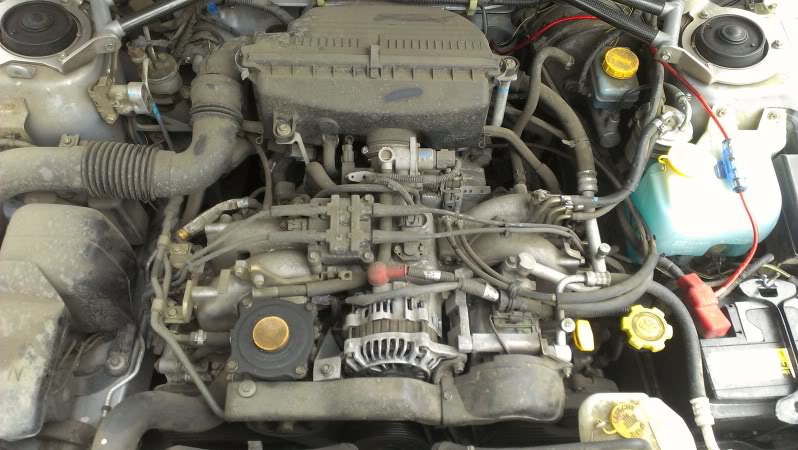
These are my '02 Forester before/after pics.
(cut and pasted from another thread)
I pulled the battery & tray, the strut brace, and the trim below the windshield. Underneath the trim was thick, caked-on dirt and debris. Before spraying any cleaners, I first vacuumed all the dirt/leaves/spiderwebs/crap out that I could. Then I took a compressed air nozzle and sprayed out the rest. With the air gun I was able to get most of the loose crap including a ton of dust. Then I sprayed Chemtool Engine Degreaser on the engine, and Simple Green on all the upper components like the fluid caps, plastic components, etc. I let that sit for just a couple minutes as I was nervous the degreaser would damage something it wasn't supposed to be on. Then I scrubbed everything down with a few different detail brushes, rinsed it all off, dried it with my air gun and took it out for a high speed run on the freeway. It looks a lot better than I was expecting without applying any dressings so I probably won't even bother with that part. The whole process took about 3 hours including setup and cleanup. Here are the before and after shots:
Before (after vacuuming/blowing out most of the crap):
After:

