
Best way to fix these? (22B replica hood vents)

Thread Starter
VIP Member
iTrader: (23)
Joined: Sep 2003
Posts: 4,969
From: Fremont
Car Info: 1999 2.5RS / 2004 Forester X
Recently purchased these online knowing that they had some defect (primarily the mouting hardware).
Ran me $45+ shipping vs $267 + shipping for the MRT replicas.
Decided I'd rather repair / fix than shell out almost 300 bucks lol.
Anyways almost all of the mounting hardware is crooked and neither set of bolts line up with the hood.
My goal is to somehow remove these bolts (encased in some epoxy or somthing... dunno what it is) and install the OEM 8mm bolts from the stock vents in their place.
So:
At least part of my plan was to take the OEM vents and make a cardboard template of the bolt hole pattern for the L / R sides and use that when putting the 8mm bolts on.
I'm no body work guru by any means but I think I can make this work.
Lmk anything that might help make this easier, thx!
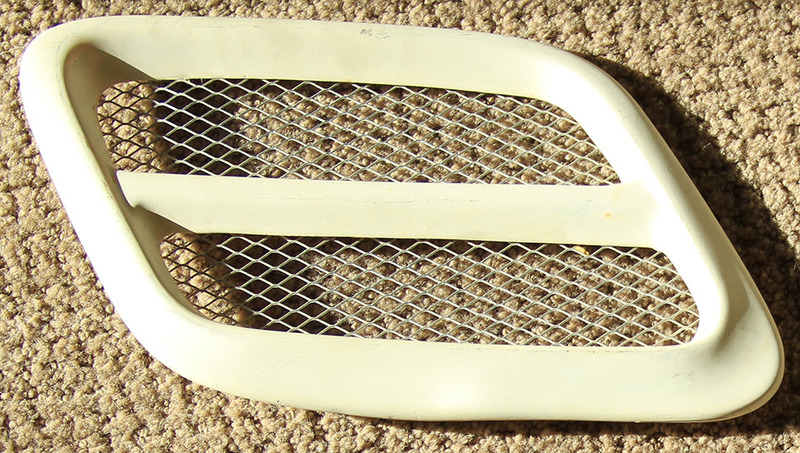
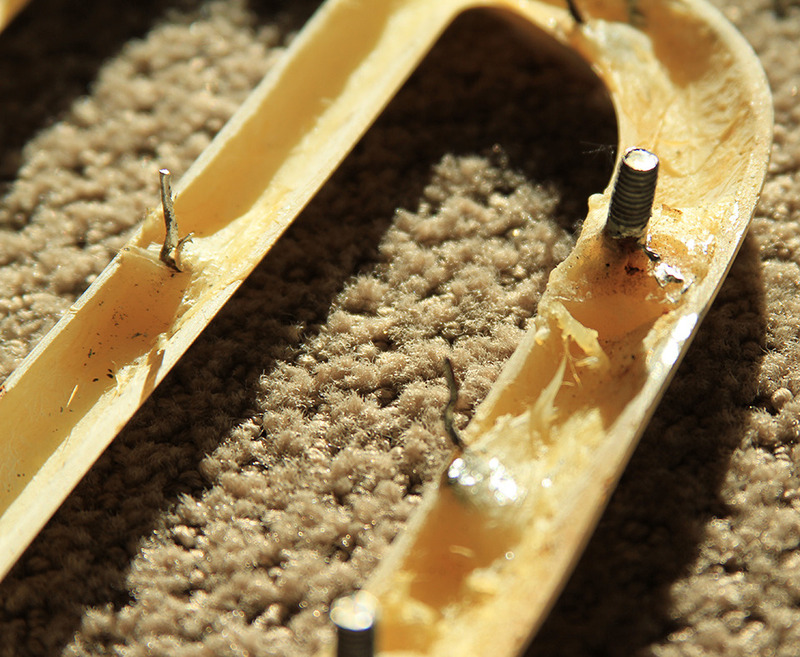
Top side
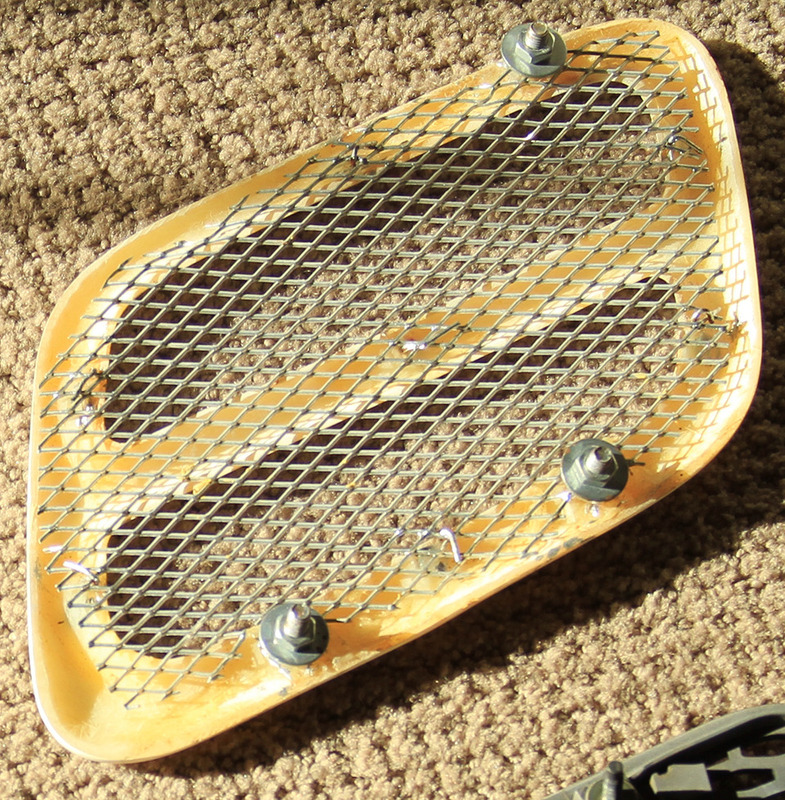
Bottom
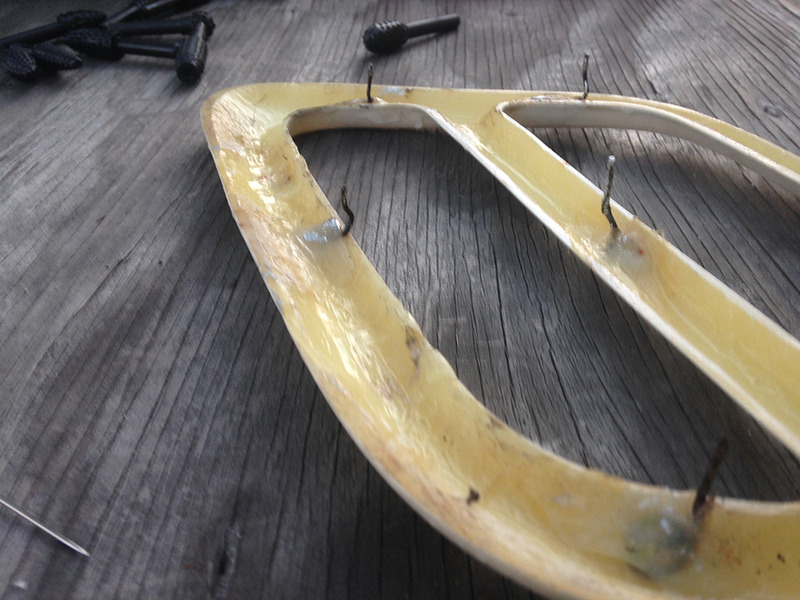
Bottom of both sides
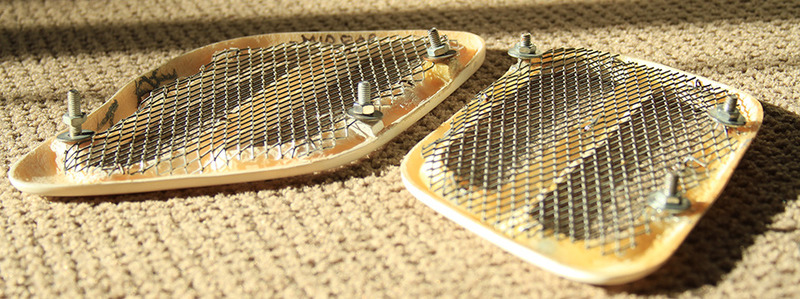
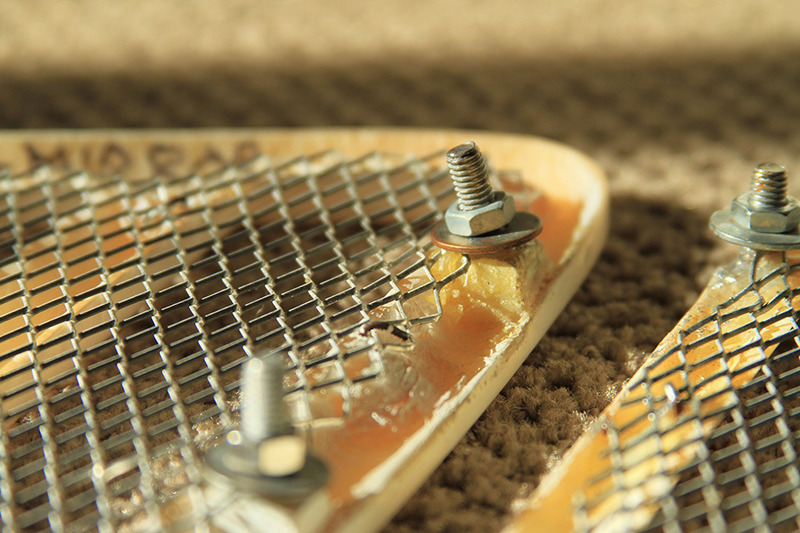
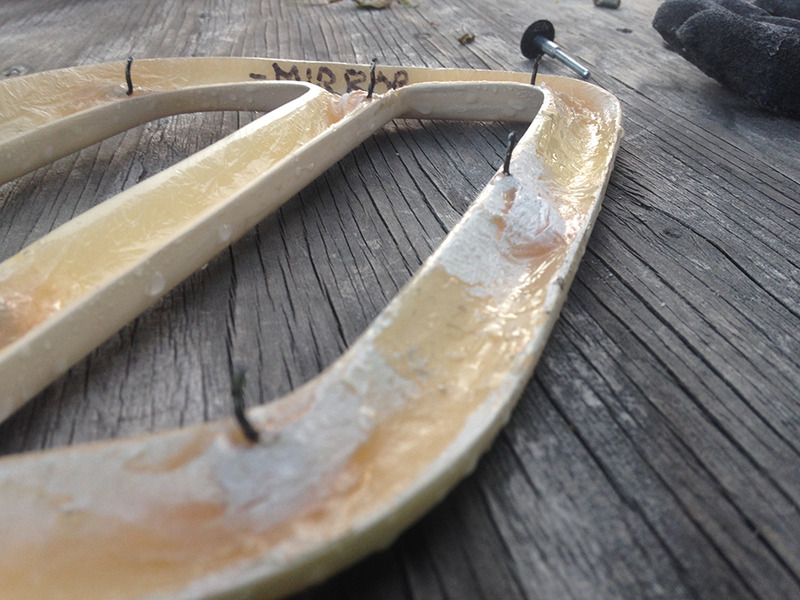
Horrible bolt installation...
Removed mesh & nuts w/ washers
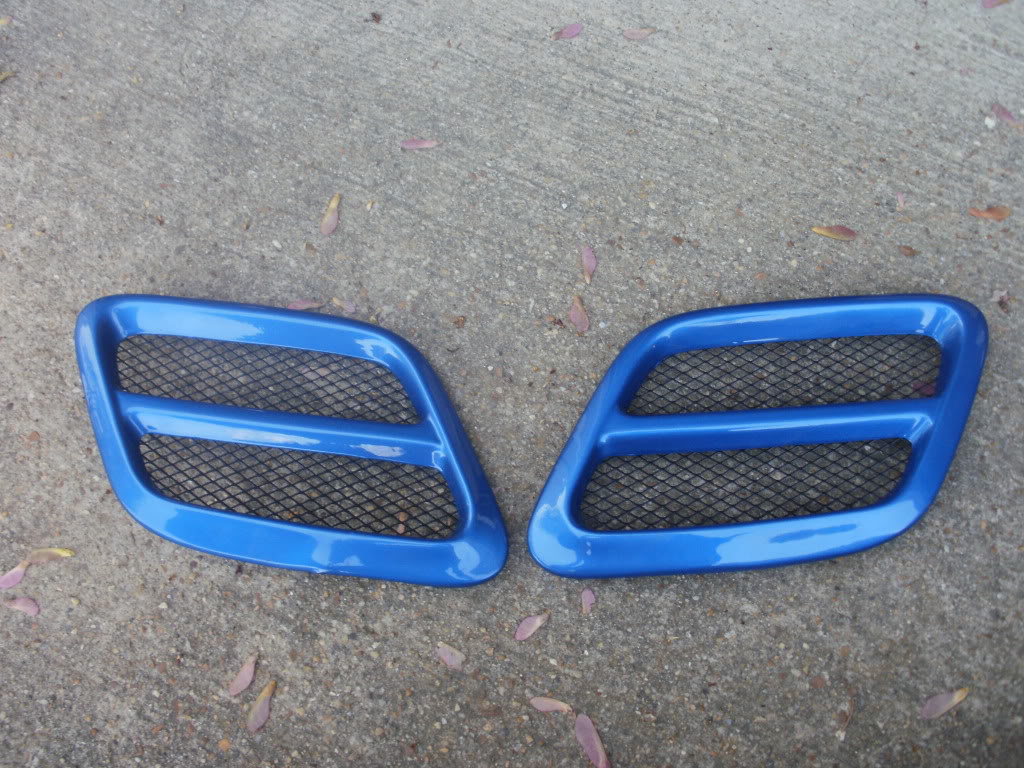
Goal is to get them to look like this in the end
Ran me $45+ shipping vs $267 + shipping for the MRT replicas.
Decided I'd rather repair / fix than shell out almost 300 bucks lol.
Anyways almost all of the mounting hardware is crooked and neither set of bolts line up with the hood.
My goal is to somehow remove these bolts (encased in some epoxy or somthing... dunno what it is) and install the OEM 8mm bolts from the stock vents in their place.
So:
- How can I remove the bolts w/ out damaging the vent? (fiberglass)
- What would be the best way to re-install OEM bolts and make them secure?
- Any other thoughts?
At least part of my plan was to take the OEM vents and make a cardboard template of the bolt hole pattern for the L / R sides and use that when putting the 8mm bolts on.
I'm no body work guru by any means but I think I can make this work.
Lmk anything that might help make this easier, thx!
Top side

Bottom

Bottom of both sides

Horrible bolt installation...

Removed mesh & nuts w/ washers

Goal is to get them to look like this in the end
Those studs will be extremely hard to remove without harm. I also have a set of the primitive racing replica vents. Good thing only one stud was slightly out of alignment after test fitment.
Due to how thin the material of the vent is, applying enough torque or cutting away material will most likely end up harming and damaging the vent way more than you would like. The studs are cured within the resin it self, so no way to really remove/extract it without breaking the material that is holding it in.
I would just try slotting the holes in the hood if you plan on using this set.
Also since only 3 studs are used, when there is actually about 2 more on the hood if I can remember correctly, you can add more/new studs and adhere them into the locations that are currently open. And then remove the most crooked studs for better installation.
VIP Member
iTrader: (4)
Joined: Dec 2004
Posts: 6,781
From: 500mi North of Montana. Enjoying free health care.
Car Info: Bugeyed Autowagon
A high speed rotary tool (aka a Dremel) to cut out the bolts and an epoxy resin to put new ones in.
Or you can make new vents buy using your current ones to make molds
Make a two part reusable mold using plaster
Or you can make new vents buy using your current ones to make molds
Make a two part reusable mold using plaster
Thread Starter
VIP Member
iTrader: (23)
Joined: Sep 2003
Posts: 4,969
From: Fremont
Car Info: 1999 2.5RS / 2004 Forester X
pho_shizzle
Actually its pretty bad lol, I wasn't able to get either vent to line up with the holes on the hood :/
Was considering trying to remove the material carefully on just 1 bolt to see what happens but like you sid it could damage the vent. Slotting the holes would work in theory only thing is that the holes are on tabs so there isn't much wiggle room.
Yea you're right, there are 2 more spots for bolts. OEM vent has 2 plastic clips that go in square holes on either side... converting those to new bolts would be a good idea.
newyork
I have a basic Dremel 2001, wondering what the best type of bit(s) to use on this would be?
Didn't think about a plaster mold! I'll have to go thru that instructable.
Thread Starter
VIP Member
iTrader: (23)
Joined: Sep 2003
Posts: 4,969
From: Fremont
Car Info: 1999 2.5RS / 2004 Forester X
Making the mold looks pretty cool, read thru the article.
I might try that another time with a different object to practice on though.
For now I'll see what I can do with what I got currently. Don't think I'll have time to tackle it till next week but I'll post back how it goes.
I might try that another time with a different object to practice on though.
For now I'll see what I can do with what I got currently. Don't think I'll have time to tackle it till next week but I'll post back how it goes.

Thread Starter
VIP Member
iTrader: (23)
Joined: Sep 2003
Posts: 4,969
From: Fremont
Car Info: 1999 2.5RS / 2004 Forester X
Ended up having an hour free before it got dark to work on this.
Had surprisingly good results using the dremel with the metal cutoff wheel.
First cut all the bolts off clean, then cut V shapes into each chunk of resin. Once the cutoff wheel started grinding on the head of the bolt it got hot enough eventually to melt some of the resin and I was able to pry them out with a screwdriver.
After all the bolts were gone I just ran the cutoff wheel back and forth in the channel to smooth it out.
Next step will be attempting to re-mount 8mm bolts on these while matching the hood's bolt pattern.
JB weld?
Bondo?
Epoxy / Resin?
Other?
I'd want something with a little bit of give to it before it hardens completely.
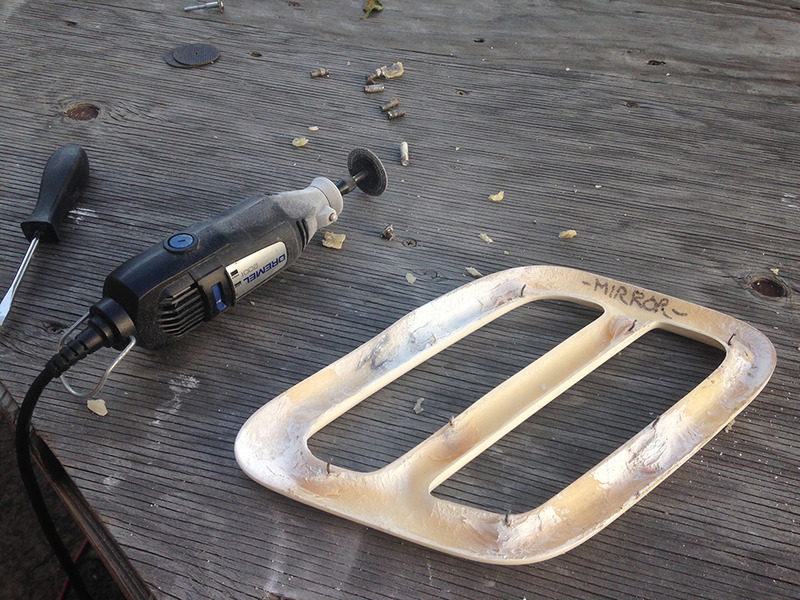
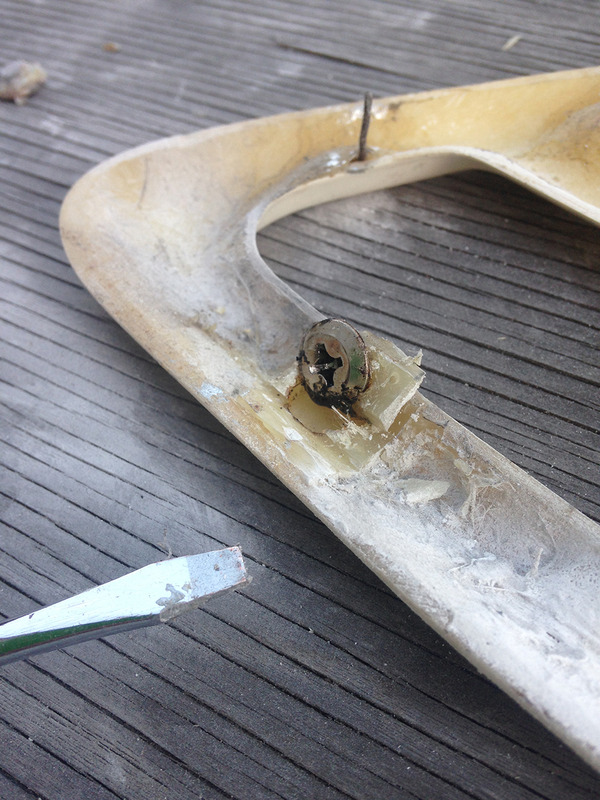


Nice progress! The extraction looks very smooth! Now you have space to just start with new studs and seat them.
I would make a template of the factory mounting points referencing from the hood and have holes drilled through to keep the new studs straight while setting.
I would vote for epoxy resin since it can harden and be molded to a shape from a gel like formula. You can also check out a local tap-plastics to see what other self curing plastics they offer. That may be the better choice.
Thread Starter
VIP Member
iTrader: (23)
Joined: Sep 2003
Posts: 4,969
From: Fremont
Car Info: 1999 2.5RS / 2004 Forester X
Nice progress! The extraction looks very smooth! Now you have space to just start with new studs and seat them.
I would make a template of the factory mounting points referencing from the hood and have holes drilled through to keep the new studs straight while setting.
I would vote for epoxy resin since it can harden and be molded to a shape from a gel like formula. You can also check out a local tap-plastics to see what other self curing plastics they offer. That may be the better choice.
I would make a template of the factory mounting points referencing from the hood and have holes drilled through to keep the new studs straight while setting.
I would vote for epoxy resin since it can harden and be molded to a shape from a gel like formula. You can also check out a local tap-plastics to see what other self curing plastics they offer. That may be the better choice.
Forgot about tap plastics, I can roll by there next time I'm in the area.
As for the mesh I removed, prob gonna go with satin black plasti dip.

Are you planning to take them out anytime? I'd try just to attach them without any screws. Just use epoxy to glue it down. I think it's strong enough to hold it in place without screws.
Thread Starter
VIP Member
iTrader: (23)
Joined: Sep 2003
Posts: 4,969
From: Fremont
Car Info: 1999 2.5RS / 2004 Forester X
Other part I didn't mention is that these vents will be going on a jdm hood I just picked up.
So the 22b vents & jdm hood w/ scoop will all need to be painted at the same time. Rather have the vents removable so they can be painted separately then bolted on the hood later.
So the 22b vents & jdm hood w/ scoop will all need to be painted at the same time. Rather have the vents removable so they can be painted separately then bolted on the hood later.
Good idea, I have a bunch of extra masonite board laying around to make templates out of. Thinking I might lay the template so the bolts just pass through the openings but don't touch the board surface, then elevate the template from the sides with some blocks.
Forgot about tap plastics, I can roll by there next time I'm in the area.
As for the mesh I removed, prob gonna go with satin black plasti dip.
Forgot about tap plastics, I can roll by there next time I'm in the area.
As for the mesh I removed, prob gonna go with satin black plasti dip.
I would just use actual spray paint or something instead of plastic dip. Plastic dip might be tedious to remove since the mesh lines are small. I painted mines gloss black and cleared them as I have no plans to repaint them any other color unless they fade or get chipped.
Thread Starter
VIP Member
iTrader: (23)
Joined: Sep 2003
Posts: 4,969
From: Fremont
Car Info: 1999 2.5RS / 2004 Forester X
On second thought, prob better to paint the mesh anyways... besides removal the plasti dip could potentially come off quick due to heat from the engine.
Made my templates today & picked up some new ss 8mm bolts w/ lock washers from the hardware store. Next step will be picking up the epoxy resin.
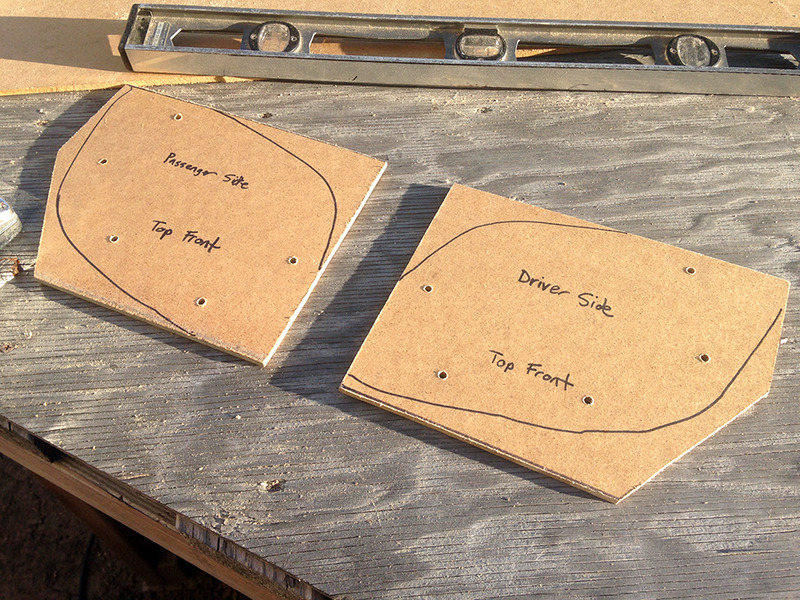
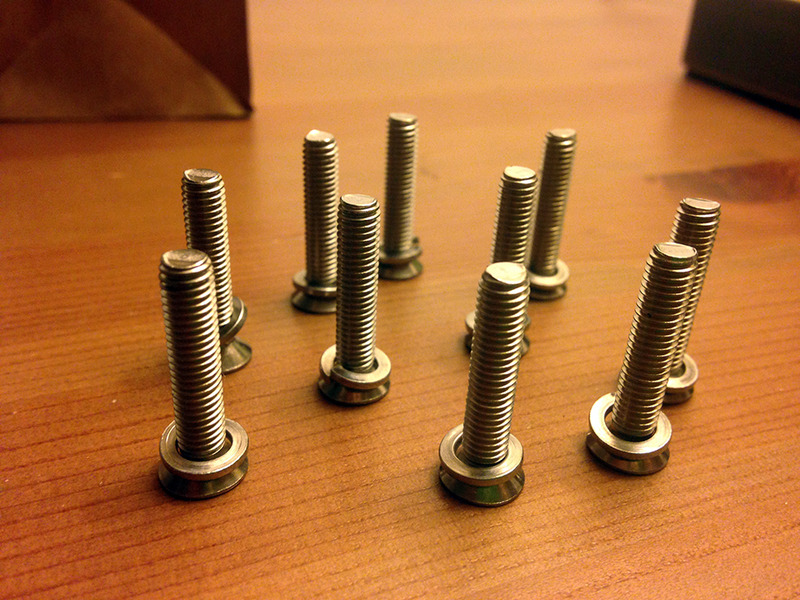
Made my templates today & picked up some new ss 8mm bolts w/ lock washers from the hardware store. Next step will be picking up the epoxy resin.

