STi RHD Projector Beam Modification
 12-25-2002, 12:50 AM
#1
Admin v2.0
Thread Starter
iTrader: (9)
Join Date: Nov 2002
Location: Alameda, CA, USA
Posts: 6,965
Car Info: 02 Black Legacy GT
With the growing popularity and falling prices on the "STi Projector" headlight housings, many people choose to buy the JDM headlights. Many of those people, fail to realize the significant differences between the headlight beam patterns that their new RHD headlights project. The cut off point of the RHD projector is exactly where you would want to have most of the light intensity while driving a LHD car in a country that drives on the left side of the road. That could not possibly blind the upcoming traffic, but also put you at high risk of accident at night.
Although the STi projector beams is "adjustable", you cannot adjust its' pattern. All you can adjust is general up and down and left to right. I played a lot with those settings and was not able to get adequate lighting where I wanted. That is why I decided to do the unthinkable and modify my STi headlights.
First of all, I would like to mention, that the following mod is not easy and you can potentially damage or completely ruin your headlight. Please proceed at your own risk.
***
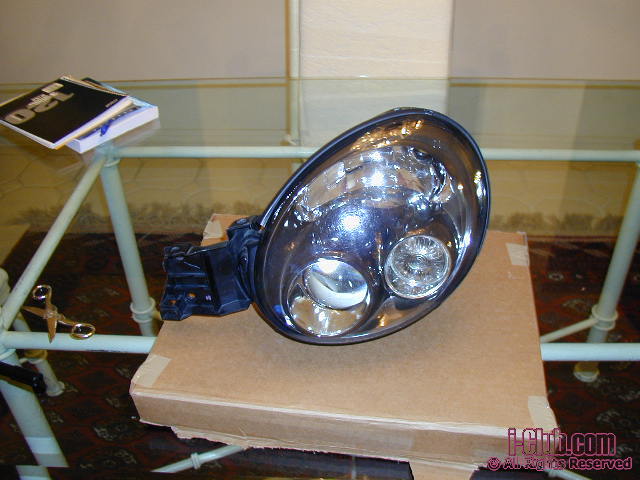
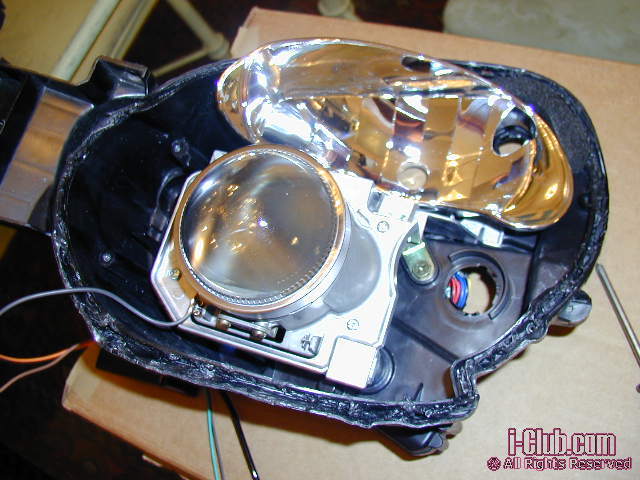
Here is the STi headlight assembly. Take your time and get to know the assembly better. All the nuts and bolts and clips. The better you know it, the less of a chance you can screw it up.
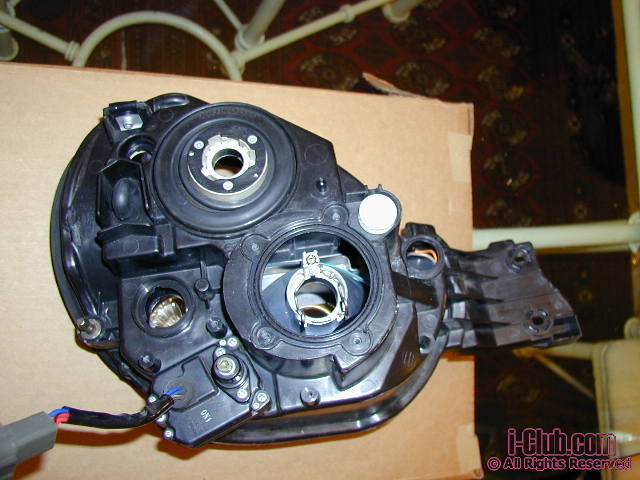
Turn the headlight over and find one or two tiny phillips screws that are located right by the edge of the headlight and secure the lens in its' position.
After you take them/it out, it is time to cook the headlight. What we want to do is to warm it up enough to soften the goo that holds the lens. I used a regular oven at 450F and kept the light there for 3-4 min.
Warning: You WILL melt your headlight if you are not careful. Temperature, oven size, heating elements positioning vary, so figure out a safe way to heat the headlight up. You can also use heat gun or any other way to heat it up.

After the headlight is nice and warm, you need to open it up. Once again, this is not easy and extremely dangerous so figure out your own way of doing it. I used a small flat head screw driver and slowly pried it open while pulling on it. Remember, there are few plastic tabs/clips that you need to push to help the lens come out.

This is the lens with the mask insert still in place.

This is the back piece with the projector lens in place.

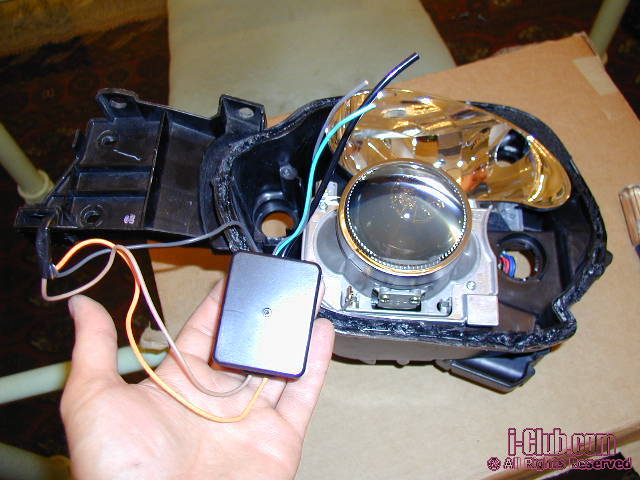
If you have the HID version of the headlight and use the aftermarket ballast and bulb, you can remove the OEM igniter from the headlight.
...
Although the STi projector beams is "adjustable", you cannot adjust its' pattern. All you can adjust is general up and down and left to right. I played a lot with those settings and was not able to get adequate lighting where I wanted. That is why I decided to do the unthinkable and modify my STi headlights.
First of all, I would like to mention, that the following mod is not easy and you can potentially damage or completely ruin your headlight. Please proceed at your own risk.
***
Here is the STi headlight assembly. Take your time and get to know the assembly better. All the nuts and bolts and clips. The better you know it, the less of a chance you can screw it up.
Turn the headlight over and find one or two tiny phillips screws that are located right by the edge of the headlight and secure the lens in its' position.
After you take them/it out, it is time to cook the headlight. What we want to do is to warm it up enough to soften the goo that holds the lens. I used a regular oven at 450F and kept the light there for 3-4 min.
Warning: You WILL melt your headlight if you are not careful. Temperature, oven size, heating elements positioning vary, so figure out a safe way to heat the headlight up. You can also use heat gun or any other way to heat it up.
After the headlight is nice and warm, you need to open it up. Once again, this is not easy and extremely dangerous so figure out your own way of doing it. I used a small flat head screw driver and slowly pried it open while pulling on it. Remember, there are few plastic tabs/clips that you need to push to help the lens come out.
This is the lens with the mask insert still in place.
This is the back piece with the projector lens in place.
If you have the HID version of the headlight and use the aftermarket ballast and bulb, you can remove the OEM igniter from the headlight.
...
 12-25-2002, 12:51 AM
#2
Admin v2.0
Thread Starter
iTrader: (9)
Join Date: Nov 2002
Location: Alameda, CA, USA
Posts: 6,965
Car Info: 02 Black Legacy GT
Now you need to remove the projector assembly from the back piece. Use an 8mm socket to unscrew the adjuster shaft from the projector.
Flip the back piece of the headlight and remove the big phillips/10mm head screw and unsnap the projector assembly from the back piece. Remember to remove the ground strap of the igniter from the projector housing.
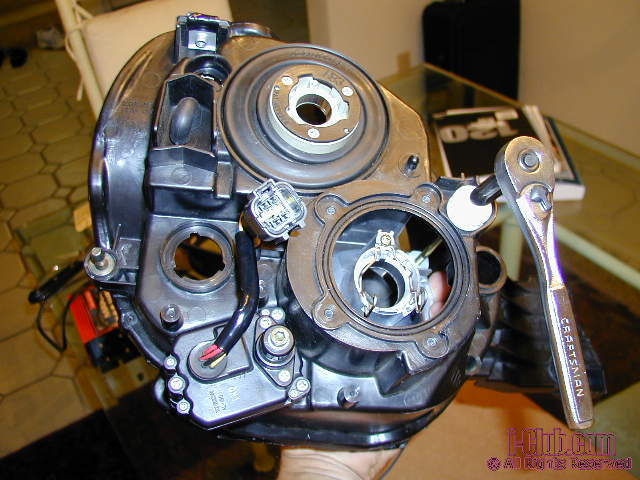
Pull the assembly out and be careful not to loose the plastic clip that you have just unsnapped.

Disassemble the assembly by removing the small phillips head screws.
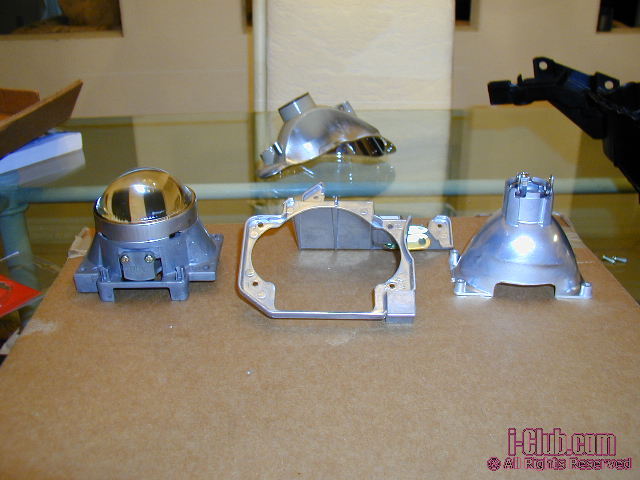
Look at the projector and the projector beam plate. You need to get it out of there.

Once it is out, you need to trim the top of it to be flat. I used a file and gently evened it out.

Here is a pic of two projector plates. The one on the right is modified. The one on the left is still RHD type. After you trim it, use a black marker and paint over any shiny part of the plate you created to avoid any kind of internal reflection.

After that, re-assemble everything. Before putting the lens back on, heat the back piece up again to soften the glue. Also, remember to wipe the projector "eye ball" and the lens clean of any finger prints and dust.
***
What you have done is evened out the projected beam pattern. Now, your lowest part of the beam will be higher. In order not to blind the upcoming traffic, I suggest you lower the beam down a little bit using the adjustment screws.
Also remember, that your headlights are not legal in most if not all states in RHD or modified form.
Flip the back piece of the headlight and remove the big phillips/10mm head screw and unsnap the projector assembly from the back piece. Remember to remove the ground strap of the igniter from the projector housing.
Pull the assembly out and be careful not to loose the plastic clip that you have just unsnapped.
Disassemble the assembly by removing the small phillips head screws.
Look at the projector and the projector beam plate. You need to get it out of there.
Once it is out, you need to trim the top of it to be flat. I used a file and gently evened it out.
Here is a pic of two projector plates. The one on the right is modified. The one on the left is still RHD type. After you trim it, use a black marker and paint over any shiny part of the plate you created to avoid any kind of internal reflection.
After that, re-assemble everything. Before putting the lens back on, heat the back piece up again to soften the glue. Also, remember to wipe the projector "eye ball" and the lens clean of any finger prints and dust.
***
What you have done is evened out the projected beam pattern. Now, your lowest part of the beam will be higher. In order not to blind the upcoming traffic, I suggest you lower the beam down a little bit using the adjustment screws.
Also remember, that your headlights are not legal in most if not all states in RHD or modified form.
 12-30-2002, 03:07 PM
#6
Guest
Posts: n/a
surprised...
Im surprised as much as u Impreza but u have to realize what u did. U toke a $2000+ object and experimented with it. Most people have to save up for the Lights muchless try to mess with them and potentially ruin them. ISeems as though what u did has alot of difficulty and the average person just wants the lights for looks and says screw safety. =o)
Nice Work though... Very nice!!
Nice Work though... Very nice!!
01-06-2003, 07:34 AM
#8
Guest
Posts: n/a
Alex,,,I think the small response is a cost issue also.Lotta dough to be experimenting with and possibly ruin your lites.
I was one of the 1st to do the headlite mod(painting inside) on the RS,same procedure basically.What i did was go to a junkyard and get a set of junk lites($15) and play around with em.Here we dont have that luxury.Another reason i see mite be that the JDM,EDM, lites have a plastic lense where the RS had glass.You get that grey goo glue caulk on the plastic lense it's gona be hell to get off.
Ive got the page bookmarked and may try it in the near future if im brave enough.
Rudy
01-06-2003, 01:31 PM
#12
Guest
Posts: n/a
For a while there EDM's were going at $650. Thats when I got mine.
Even with LHD EDM lights, you might want to look into doing this since the upsweep puts alot of light on the road at the rear of drivers to the right of you. This can annoy them. Enough so that I got road raged by a guy on the way back from Vegas one night because he thought my lites were too bright. He followed me for about 15 minutes with his brights on. I would have sped away but it wasn't a gread road to be doing that on.
I know of one guy who did this to his headlights a while back and it sounds like the best way to have your lights, LHD or RHD. This way you can aim them just high enough not to bother people going the oppisite direction and get maximum beam penetration without bothering people going your direction.
Dan
01-06-2003, 06:45 PM
#14
Guest
Posts: n/a
Originally posted by jkwon
Wow...I'm impressed. The only question I have is why not just buy the LHD JDM HID??
Also, Sti Wagon...you have to do this to remove the orange turn signal cover?? I've been wanting to remove mine.
--joe
Wow...I'm impressed. The only question I have is why not just buy the LHD JDM HID??
Also, Sti Wagon...you have to do this to remove the orange turn signal cover?? I've been wanting to remove mine.
--joe
01-15-2003, 09:09 AM
#15
Guest
Posts: n/a
Thanks for jumping into this problem & finding an alternative to pissing off all other nite drivers. I installed a set of these RHD projectors yesterday, I had to go help a friend that night & got flashed at least 4 times in a half hour of driving. Well, I'm stuck home with a sick kid so into the oven they go! If I can't get all yhe info I need from your previous post i'll be bugg'n for help. Thanks, Vince...