HOWTO: GR Stumble Mod Workaround (2008-2015 STI)
 10-17-2014, 04:50 PM
#1
Registered User
Thread Starter
iTrader: (3)

Join Date: Jan 2012
Location: Dublin, CA
Posts: 608
Car Info: STI Hatch - 2012
HOWTO: GR Stumble Mod Workaround (2008-2015 STI)
Note:
The hose lengths listed in the instructions below were tested on a 2008-2014 STI, the 2015+ STI might may / or may not need slight alteration to the hose lengths. The 2015 looks like it has a slightly different bend on the line going from the fuel feed damper -> feed hard line on the manifold. And maybe the return line between the manifold return hard line -> return line damper.
Background:
Stage 1 and 2 cars get the annoying stumble which is driving me nuts (Cobb AP Stage 2 ACN91). I wanted to convert to an Open Source tune using ECU FLASH and ROMRAIDER so I contacted Eric at Torqued Performance and he recommended the iAP Stumble Fix, or the Cobb Stumble Fix as a pre-requisite. I balked when I saw the price (199$ and 299$ respectively) of the stumble fix so I decided to save some money by building one myself. This particular fix gets rid of the OEM dampers on both return and feed along with the "balance" tube. It basically converts the system to a serial setup just like the older GD's. Please note that this particular fix only works on the stock setup, when one goes large injectors - seems like a different setup is needed.
Tools Needed:
Parts Needed:
4 count - - around 5$ (#Dorman 800-080 - note, sold as a PAIR so only buy 2 pairs)
2 count - - must MEET SAE 30R9 specifications - around 9$ each (#Dayco 80079)
1 count - - 13$ (#PTN0.50BK10)
1 count - http://www.ebay.com/itm/261191598660?_trksid=p2060778.m2749.l2649&var=560190057138&ssPageName=STRK%3AMEBIDX%3AIT - around 2$ (#T17932-3)
6 count - Oetiker 16700013 One Ear, Stepless, Stainless Steel Crimp On Clamps - less than 6$ for a pack of TEN (#16700013) - Note: the size is 14.5 MM and has a range of 12mm -> 14.5mm
2 count - http://www.ebay.com/itm/281377983167?_trksid=p2060778.m2749.l2649&var=580407920792&ssPageName=STRK%3AMEBIDX%3AIT - 5$ for a bag of 10 (#C17611-08)
1 count - Subaru/Denso Fuel Pressure Regulator - 78$ (#22670AA351)
1 count - M8-1.25 x 40MM Metric Flange Bolt - 2$ (#030699365586) at Home Depot
1 count - M8-1.25 Flange Nut - 1$ (#887480039184) at Home Depot
1 count - 1 Inch Nylon Spacer - 1$ (#887480150483) at Home Depot
2 count - 3/4 Inch Black Heat Shrink Tubing 2$ (HST-750B) at Home Depot - Note: package comes with 2 tubes, so you need two pairs


Parts (Optional)
Standard Motor Products Fuel Pressure Damper (#FPD71)
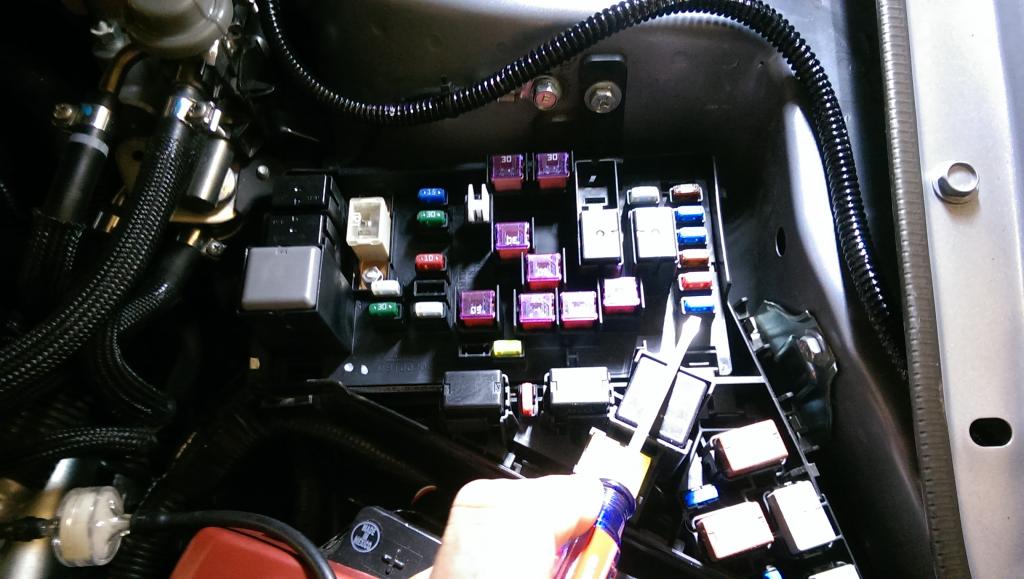
 Step 1: Disable the Fuel Pump by removing the fuse (15 amp fuse, which I'm pointing at), turn on the car until it dies. Crank it one or two more times.
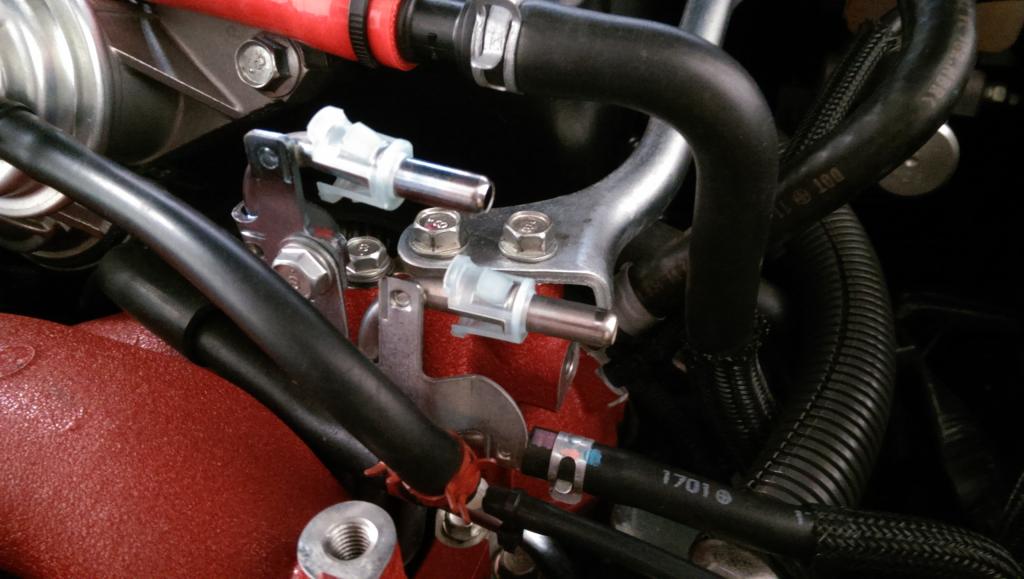
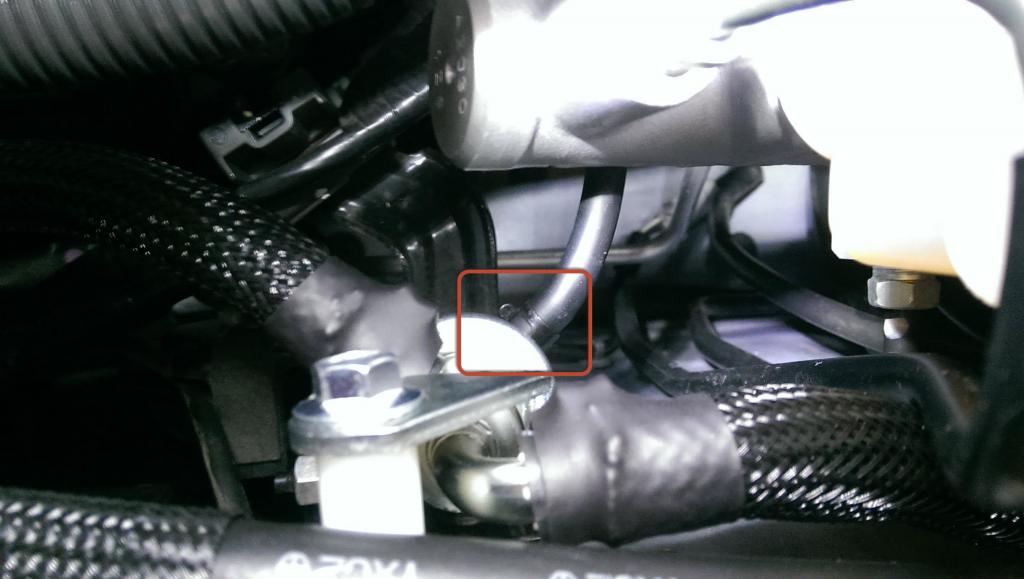
Step 2: Using two zip ties, disconnect the fuel feed quick connect fitting on both the manifold and the firewall side. Make sure you have a towel handy just in case the line sputters some fuel out. You will have to do the same on the return line on both the manifold and the firewall. The return line on the firewall side is underneath the "BLUE" line pictured.
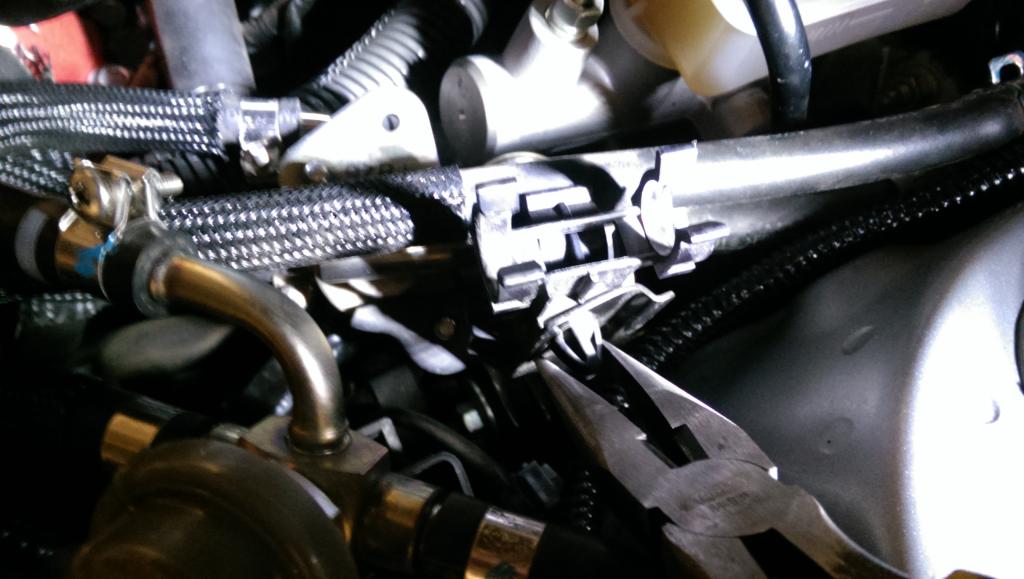
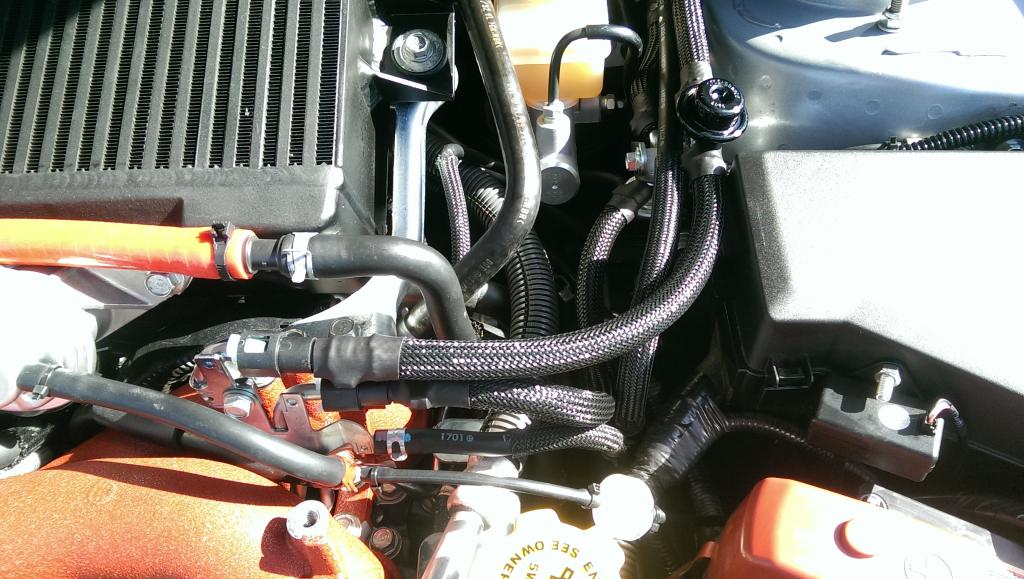
Step 3: Unclip the fuel hoses from the plastic stay, then remove the plastic stay by unclipping it from the metal bracket.
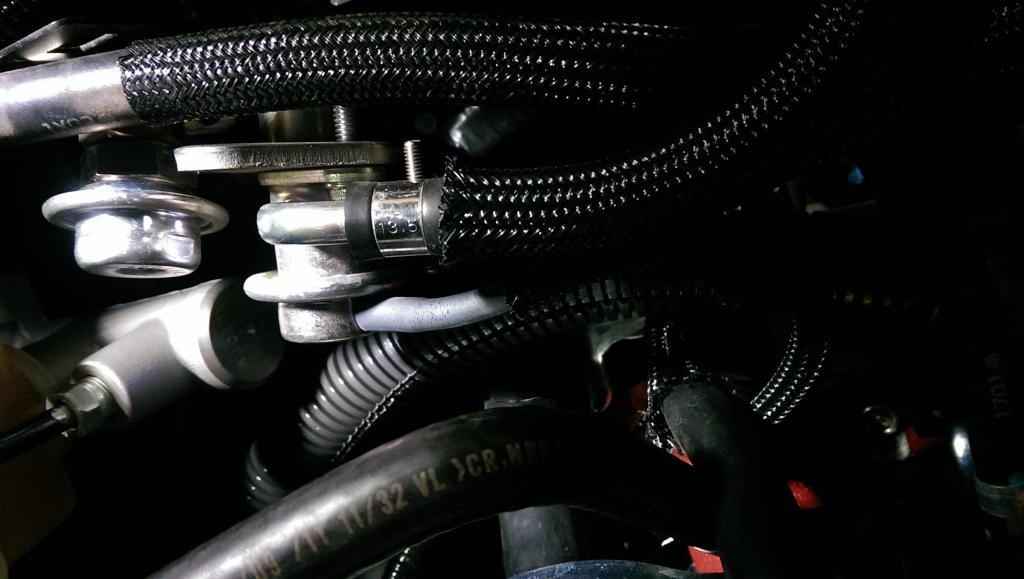
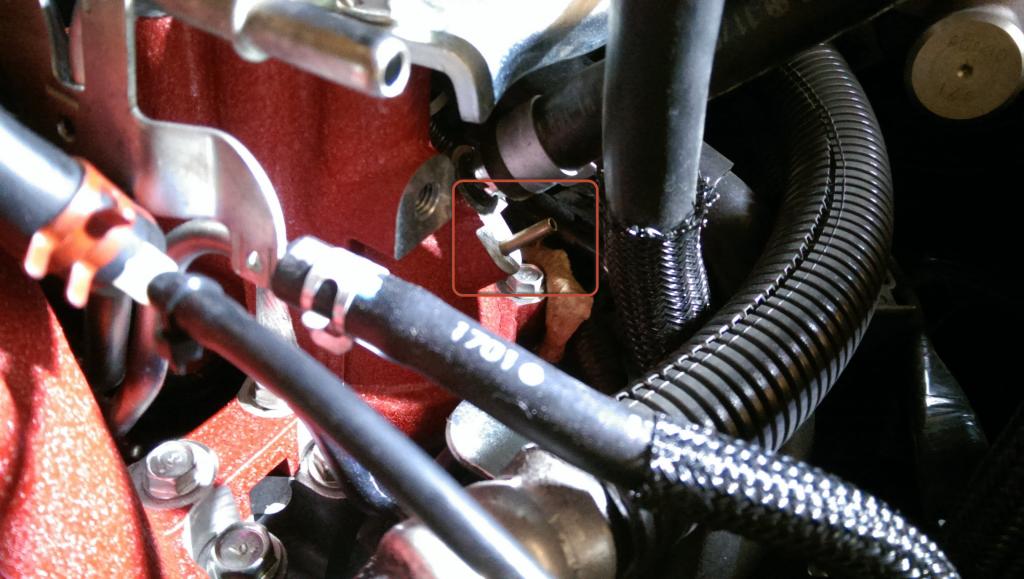
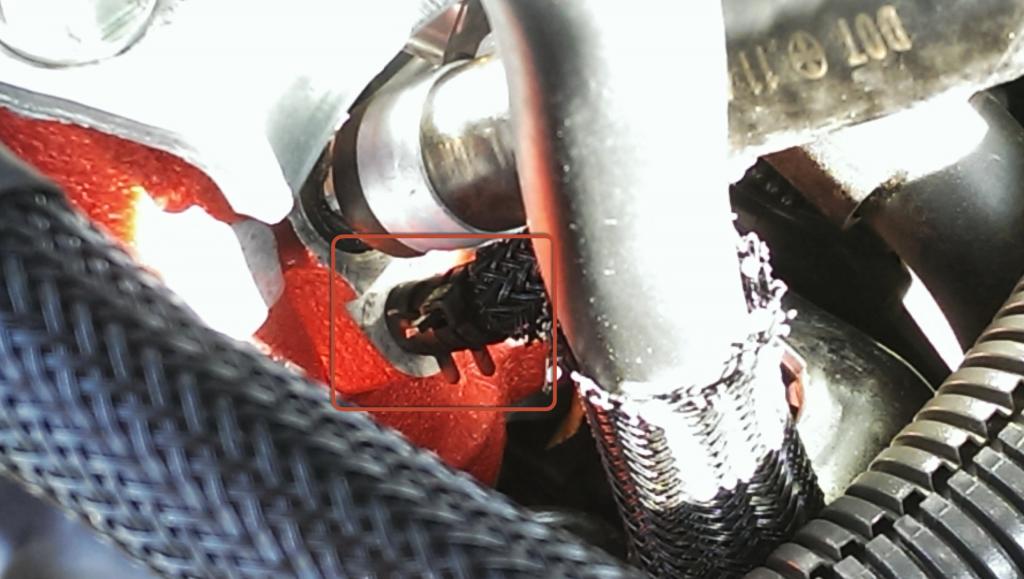
Step 4: Remove the fuel pressure regulator pressure source line by disconnecting it from both manifold and the fuel pressure regulator. It needs to be replaced as it's too short.
Step 5: Remove the feed and return lines along with the dampers as one unit and put it aside.
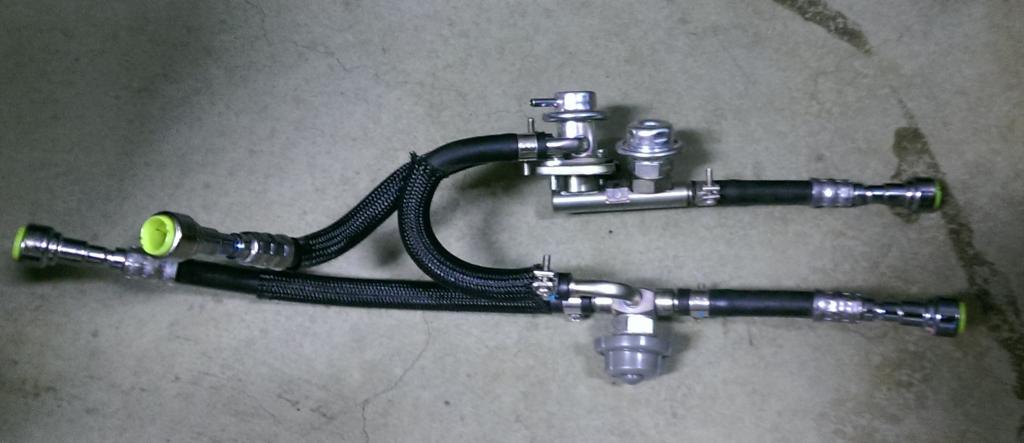
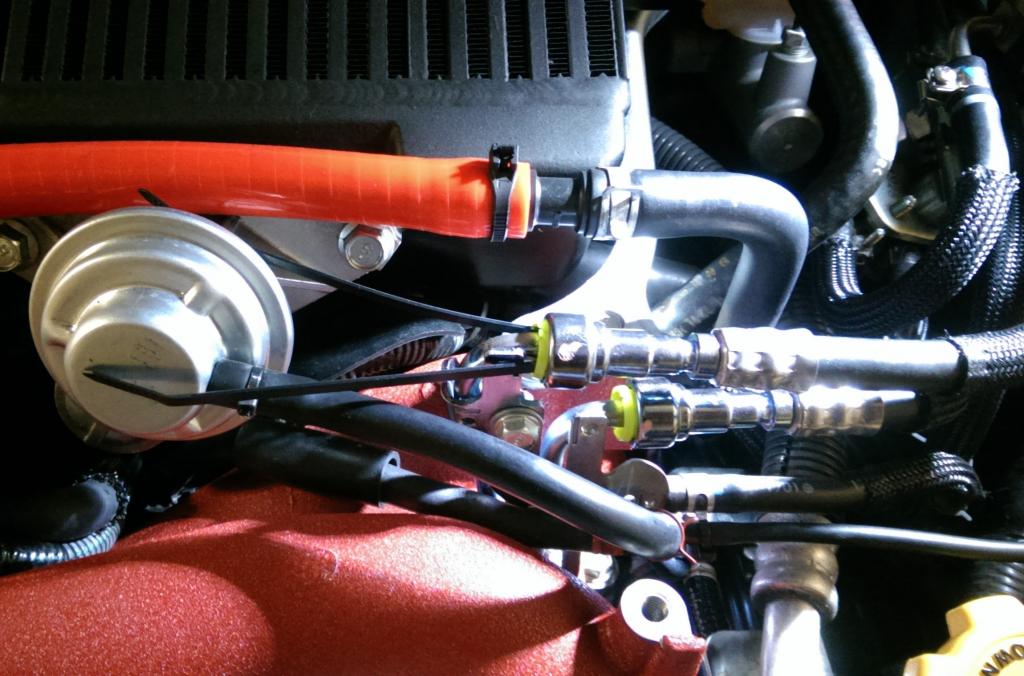
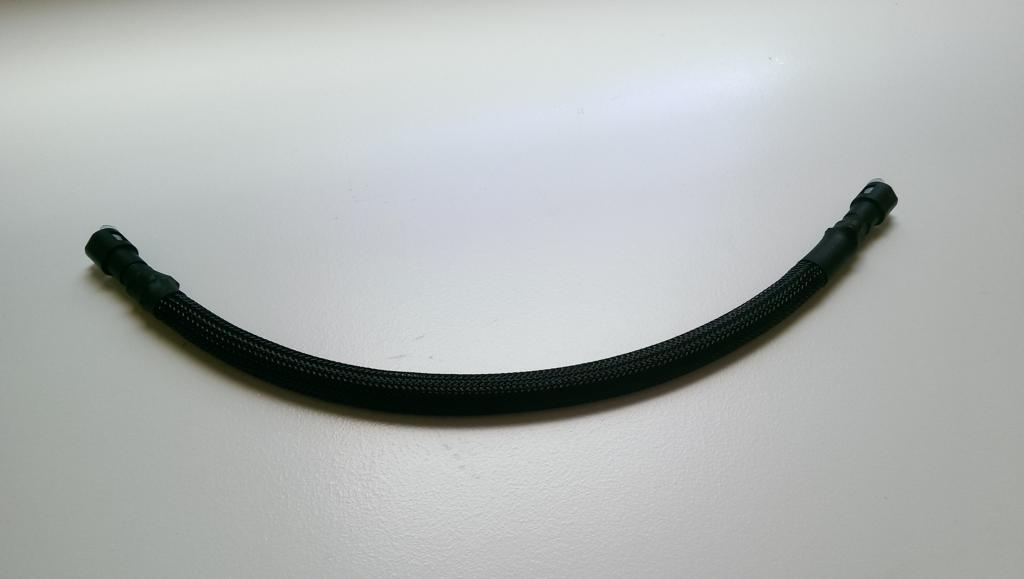
Step 6: Assemble the Feed Line - Cut one of the hoses to exactly 15 5/8 INCHES, then slide one side of the hose to the fitting. Crimp on one of the clamps at the assembled hose end. Cut the appropriate length of the braided cable sleeve which will cover the hose from clamp to clamp. Make sure you melt the edges (with a hot knife) of the braided cable sleeve to prevent it from fraying. Insert the braided cable sleeve ontop the hose, then cut two 1 inch strips of the heat shrink tubing. Insert the heat shrink tubing ontop the braided cable sleeve then insert another hose clamp. Attach another quick connect on the remaining hose end then crimp on the hose clamp. Position the braided cable sleeve in between the two hose clamps, center the heat shrink tubings so that it envelopes the clamps, then use a heat gun to shrink the tubing. The finished product will look something like below.
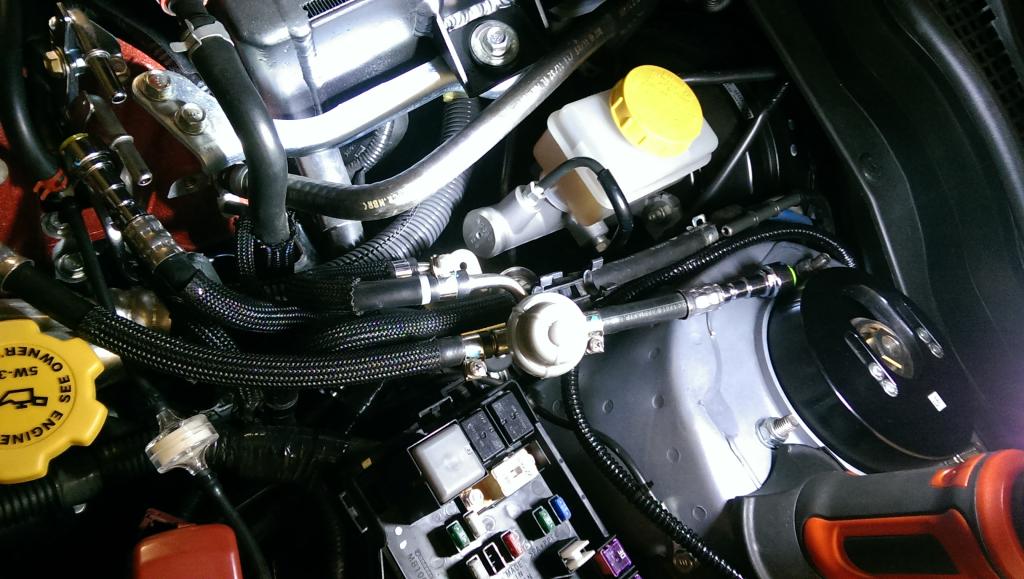
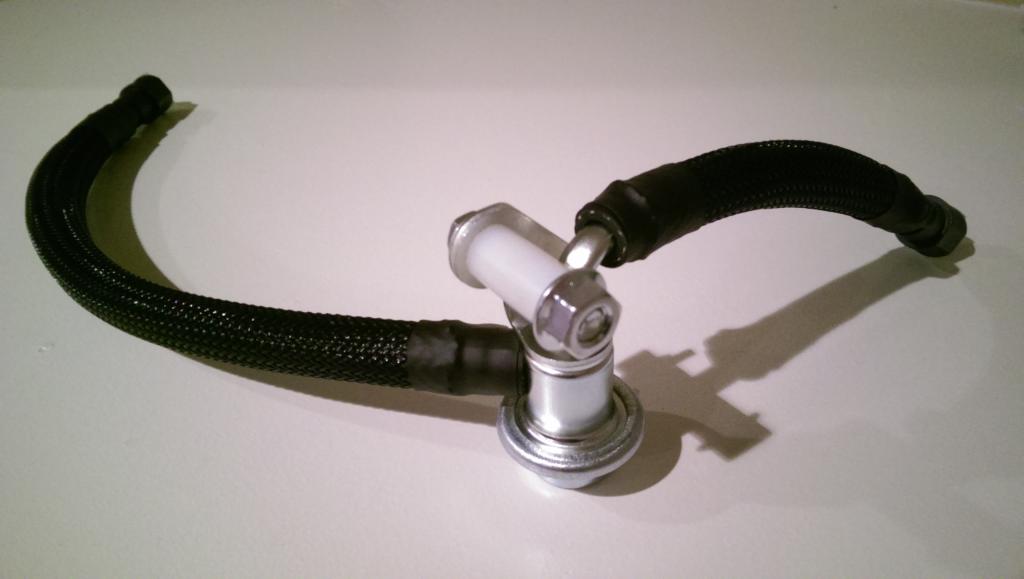
Step 7: Assemble the Return Line - Cut one of the hoses to exactly 11 and 1/4 INCHES, cut the remainder of said hose to 5 INCHES. Assemble as pictured below. The short hose leads to the bottom fuel return port on the firewall. The long one leads to the bottom return port on the manifold.
Step 8: Attach the quick connect clips onto the hard lines. Connect the assembled return line to both the firewall (lower port - short hose), and the manifold fuel return (lower port - long hose). Bolt the fuel pressure regulator eyelet using the bolt, the spacer, and the nut to the bracket. Make sure the quick disconnect fittings click in place on both the firewall and manifold hard lines.

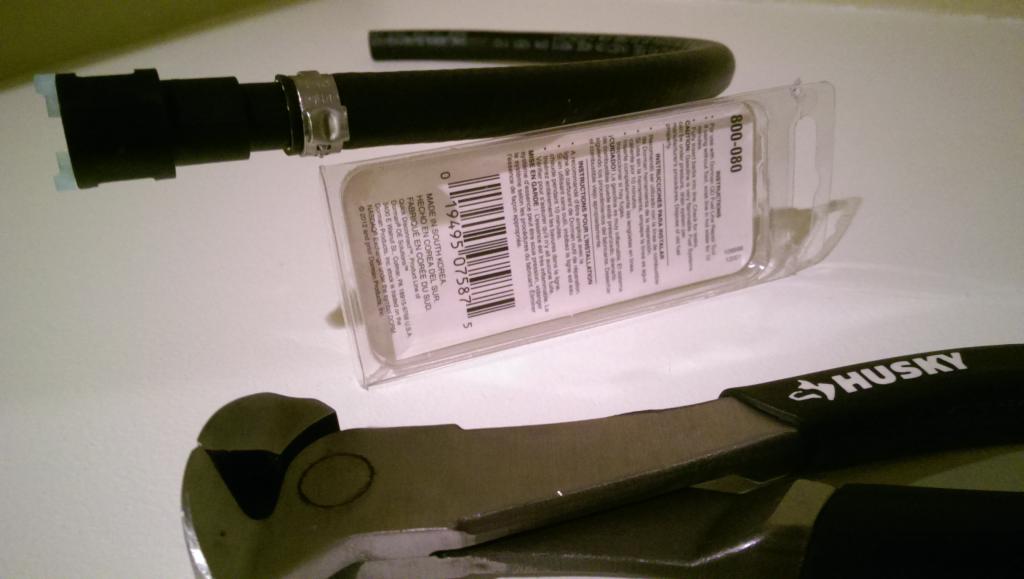
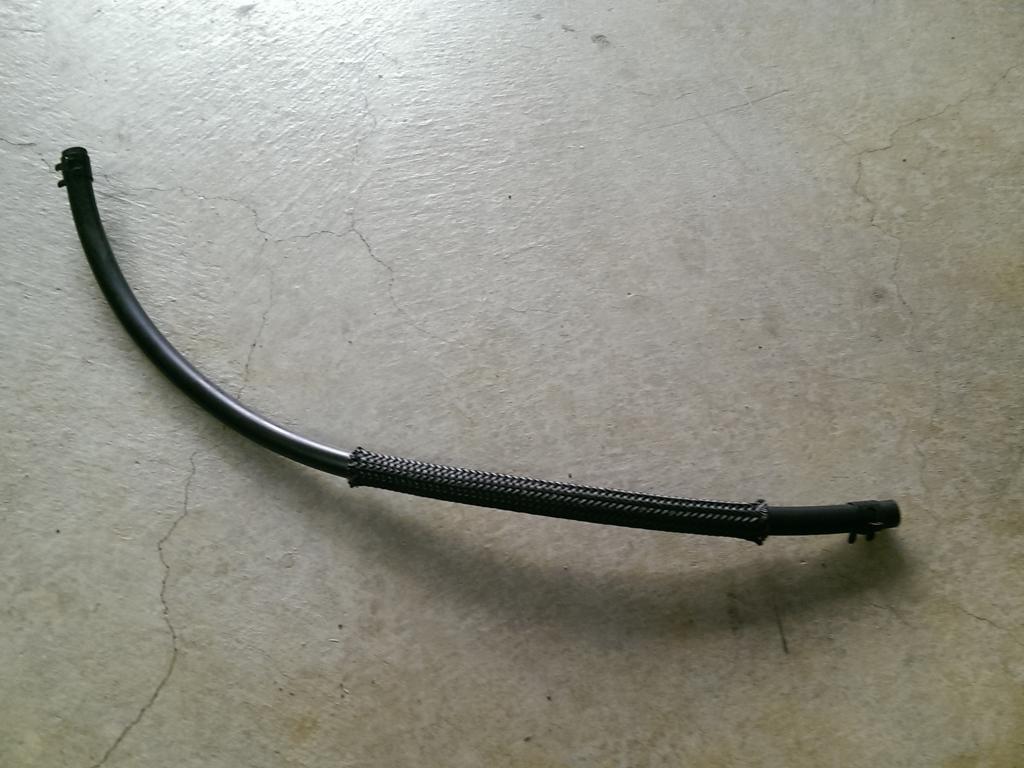
Step 9: Time to install the fuel pressure regulators pressure reference hose. Remove the braid from the stock FPR pressure hose and add add it to the new hose. Attach the new hose to both the Manifold Pressure Source, and the Fuel Pressure Regulator pressure reference port. Secure the hose to the barbs by using the Corbin Clamps.
Step 10: Attach the fuel feed line to both the manifold side (top port) and the firewall side (top port). Make sure the quick connect fittings are inserted all the way and clicks into place. Add the FUEL PUMP fuse back in and close the fuse box.
Step 11: Prime the fuel system by turning your car on and off three times (but don't start it), wait at least 4 seconds in the ON position before each cycle. Feel around the clamps, hose fittings and make sure there are no leaks. Start the car and while it's idling, check for FUEL leaks - feel around the clamps, hose fittings and make sure they are dry.
Step 12: After one or two heat cycles, double check the quick connect fittings to make sure they are still snug.
The hose lengths listed in the instructions below were tested on a 2008-2014 STI, the 2015+ STI might may / or may not need slight alteration to the hose lengths. The 2015 looks like it has a slightly different bend on the line going from the fuel feed damper -> feed hard line on the manifold. And maybe the return line between the manifold return hard line -> return line damper.
Background:
Stage 1 and 2 cars get the annoying stumble which is driving me nuts (Cobb AP Stage 2 ACN91). I wanted to convert to an Open Source tune using ECU FLASH and ROMRAIDER so I contacted Eric at Torqued Performance and he recommended the iAP Stumble Fix, or the Cobb Stumble Fix as a pre-requisite. I balked when I saw the price (199$ and 299$ respectively) of the stumble fix so I decided to save some money by building one myself. This particular fix gets rid of the OEM dampers on both return and feed along with the "balance" tube. It basically converts the system to a serial setup just like the older GD's. Please note that this particular fix only works on the stock setup, when one goes large injectors - seems like a different setup is needed.
Tools Needed:
2 Medium sized Zip ties
Hose Cutter
Heat Gun
Scissors
End Nipper (eq. Husky / Home Depot Model #48060 for crimping Oetiker clamps)
Hose Cutter
Heat Gun
Scissors
End Nipper (eq. Husky / Home Depot Model #48060 for crimping Oetiker clamps)
4 count - - around 5$ (#Dorman 800-080 - note, sold as a PAIR so only buy 2 pairs)
2 count - - must MEET SAE 30R9 specifications - around 9$ each (#Dayco 80079)
1 count - - 13$ (#PTN0.50BK10)
1 count - http://www.ebay.com/itm/261191598660?_trksid=p2060778.m2749.l2649&var=560190057138&ssPageName=STRK%3AMEBIDX%3AIT - around 2$ (#T17932-3)
6 count - Oetiker 16700013 One Ear, Stepless, Stainless Steel Crimp On Clamps - less than 6$ for a pack of TEN (#16700013) - Note: the size is 14.5 MM and has a range of 12mm -> 14.5mm
2 count - http://www.ebay.com/itm/281377983167?_trksid=p2060778.m2749.l2649&var=580407920792&ssPageName=STRK%3AMEBIDX%3AIT - 5$ for a bag of 10 (#C17611-08)
1 count - Subaru/Denso Fuel Pressure Regulator - 78$ (#22670AA351)
Alternatives to OEM part number, note - these are identical to the OEM
Standard Motor Products #PR452
AutoZone #800-564
O'Reilly Auto Parts (#BWD-24160)
Standard Motor Products #PR452
AutoZone #800-564
O'Reilly Auto Parts (#BWD-24160)
1 count - M8-1.25 Flange Nut - 1$ (#887480039184) at Home Depot
1 count - 1 Inch Nylon Spacer - 1$ (#887480150483) at Home Depot
2 count - 3/4 Inch Black Heat Shrink Tubing 2$ (HST-750B) at Home Depot - Note: package comes with 2 tubes, so you need two pairs
Note: any 5/16 ID Fuel Injection Hose will do as long as it meets the SAE 30R9 specifications - high pressure hose.
Standard Motor Products Fuel Pressure Damper (#FPD71)
Step 2: Using two zip ties, disconnect the fuel feed quick connect fitting on both the manifold and the firewall side. Make sure you have a towel handy just in case the line sputters some fuel out. You will have to do the same on the return line on both the manifold and the firewall. The return line on the firewall side is underneath the "BLUE" line pictured.
Step 3: Unclip the fuel hoses from the plastic stay, then remove the plastic stay by unclipping it from the metal bracket.
Step 4: Remove the fuel pressure regulator pressure source line by disconnecting it from both manifold and the fuel pressure regulator. It needs to be replaced as it's too short.
Note: the manifold side has a BARB, make sure you pull the hose back, and not sideways as you don't want to break / bend this BARB.
Step 5: Remove the feed and return lines along with the dampers as one unit and put it aside.
Step 6: Assemble the Feed Line - Cut one of the hoses to exactly 15 5/8 INCHES, then slide one side of the hose to the fitting. Crimp on one of the clamps at the assembled hose end. Cut the appropriate length of the braided cable sleeve which will cover the hose from clamp to clamp. Make sure you melt the edges (with a hot knife) of the braided cable sleeve to prevent it from fraying. Insert the braided cable sleeve ontop the hose, then cut two 1 inch strips of the heat shrink tubing. Insert the heat shrink tubing ontop the braided cable sleeve then insert another hose clamp. Attach another quick connect on the remaining hose end then crimp on the hose clamp. Position the braided cable sleeve in between the two hose clamps, center the heat shrink tubings so that it envelopes the clamps, then use a heat gun to shrink the tubing. The finished product will look something like below.
Note: the OEM feed line is 18 and 3/8 inches from fitting end to fitting end, the new one should be about the same or slightly longer. If you are adding the listed FUEL PRESSURE DAMPER noted above, then you need to cut the hose. The hose leading to the manifold should be 10 and 1/4 inch long, and the hose to the firewall should be 4 and a 1/2 inches long.
Step 7: Assemble the Return Line - Cut one of the hoses to exactly 11 and 1/4 INCHES, cut the remainder of said hose to 5 INCHES. Assemble as pictured below. The short hose leads to the bottom fuel return port on the firewall. The long one leads to the bottom return port on the manifold.
Step 8: Attach the quick connect clips onto the hard lines. Connect the assembled return line to both the firewall (lower port - short hose), and the manifold fuel return (lower port - long hose). Bolt the fuel pressure regulator eyelet using the bolt, the spacer, and the nut to the bracket. Make sure the quick disconnect fittings click in place on both the firewall and manifold hard lines.
Step 9: Time to install the fuel pressure regulators pressure reference hose. Remove the braid from the stock FPR pressure hose and add add it to the new hose. Attach the new hose to both the Manifold Pressure Source, and the Fuel Pressure Regulator pressure reference port. Secure the hose to the barbs by using the Corbin Clamps.
Step 10: Attach the fuel feed line to both the manifold side (top port) and the firewall side (top port). Make sure the quick connect fittings are inserted all the way and clicks into place. Add the FUEL PUMP fuse back in and close the fuse box.
Step 11: Prime the fuel system by turning your car on and off three times (but don't start it), wait at least 4 seconds in the ON position before each cycle. Feel around the clamps, hose fittings and make sure there are no leaks. Start the car and while it's idling, check for FUEL leaks - feel around the clamps, hose fittings and make sure they are dry.
Step 12: After one or two heat cycles, double check the quick connect fittings to make sure they are still snug.
Last edited by Funks; 11-25-2014 at 12:36 AM.


Thread
Thread Starter
Forum
Replies
Last Post
Funks
NorCal Classifieds
10
05-23-2015 02:02 PM
joejoe69
Hawaii Classifieds
0
02-12-2015 12:18 AM
Funks
NorCal Classifieds
8
12-16-2014 07:45 PM